
Learn how to use the HAL Robotics Framework.
• documentation home• decode
• Grasshopper SDK
• back to main site
• issues and bugs
ABB
0. Tips
- Your Controller must be in automatic mode to Upload code.
- Before Uploading any new Procedures, ensure that all other Modules (which aren’t required for system variables) are unloaded. Otherwise there is a risk of a clash between two loaded Main procedures or automatically named variables.
1. Controller Options
Objective:
In this section we’ll explain which Subsystems are available in the HAL Robotics Framework for Universal Robots and that their Capabilities are. These will be used when you Configure a Virtual Controller.
Background:
Industrial Controllers are typically comprised of core functionality, such as the ability to run a program, extended through optional extras, like communication protocols or multi-Robot support. To ensure that we only try and interact with your real Controller in a way that is compatible, be it through a network or with exported code, we have added a means to configure your Controller. The constituent parts of this are:
a. Controller - this is essentially a computer to which your Robot and Signals are connected.
b. Capabilities - these are how we organize what a Controller can do and draw parallels between different manufacturers’ Controllers. Capabilities are things like the ability to Upload code to the Controller from a PC or the ability to read the values of Signals remotely.
c. Subsystems - these are similar to the options you have in your Controller. They are the actual software modules that implement different Capabilities.
Details:
You’ll find a number of different ABB controllers in our catalogs but between the multiple OmniCore and IRC5 versions the only major difference is the geometry. The Controller type (OmniCore or IRC5) will also define which software versions are available and therefore which Subsystems can be chosen.
| Subsystem Name | Description | Capabilities | Configuration |
|---|---|---|---|
| ABB RAPID X.X | Translates Procedures to ABB’s RAPID programming language. | Language | > Enabled - Whether to export the procedure. > Library Mode - Whether to export code that will run directly or that can be called from another function. > Max Actions - Maximum number of actions to have in a single .mod file. Any more and the Procedure will be created in multiple files. The maximum allowed by ABB is around 35,000 lines. > Task Alias - Name of the Task into which the Procedure should be uploaded. |
| PCSDK | Remote Controller interaction library (available in RobotWares before 7.x) which requires the installation of he SDK with either RobotStudio or with the HAL.ABB extension. | Upload Execution Monitor File Manager Read Signals Write Signals Logger Backup |
> IP - IP address of your remote robot or simulator. > Credentials - Credentials needed to log in to the robot (or simulator) remotely. Defaults will work unless they have been changed in your robot’s settings. > Detected Controllers - Selectable controllers which the PCSDK has discovered on your network. |
| Robot Web Services (RWS) | Successor to the PCSDK which allows HTTP-based communication with the controller (available in RobotWares 6.x or later). | Upload Execution Monitor File Manager Read Signals Write Signals Logger Execution Monitoring |
> IP - IP address of your remote robot or simulator. > Credentials - Credentials needed to log in to the robot (or simulator) remotely. Defaults will work unless they have been changed in your robot’s settings. |
| Externally Guided Motion (EGM) | Enables low-latency state streaming to/from the controller via ABB’s Externally Guided Motion (EGM) protocol. This requires a software option from ABB and configuration on the controller. | Monitor Stream Receive State |
> IP - IP address of your remote robot or simulator. > Port - Port configured on the controller to receive EGM commands. |
2. Uploading Code
Objective:
In this section we’ll explain how to get the Procedures you’ve generated onto your robot. There are two different ways to do this, either manually or remotely.
Remote:
- Ensure your controller is configured to communicate with your controller. See Controller Options and Configure a Virtual Controller for more details about what your options are.
- Follow the instructions in Upload a Procedure.
- That’s all!
Manual (via Teach Pendant):
- Export your Procedure to a known directory.
- Copy the {ProcedureName}.mod file onto a USB stick.
- Insert the USB stick into the USB port on the teach pendant.
-
Navigate to the Program Editor and select Modules (in the top centre of the screen) -> File -> Load Module.
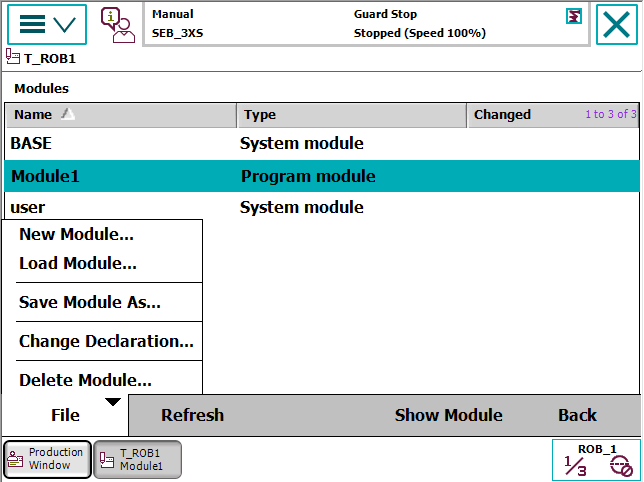
- Navigate to your Module file on the USB stick and click OK.
- Return to the Production Window.
- Select PP to Main.
- You are now ready to run your Procedure.

3. Simulation
Objective:
Whilst we expect most users to use our own simulation tools for the majority of their cases, there may be a reason (e.g. cycle time analysis, or validation of the robot’s limits) that you want to run your Procedures on a manufacturer-provided simulator. This section details what you’ll need and how to configure that simulator.
Requirements to follow along:
- Windows PC
How to:
ABB’s robot simulation tool is RobotStudio. A license is required for advanced functionality but to test basic code functionality you can simply do the following:
- Open RobotStudio
- If this is the first time you’re opening RobotStudio, it will direct you to install a RobotWare version. Install the same version as your real controller.
- Create a new empty Station.
- From the Home tab, select Virtual Controller -> New Controller.
- Pick your robot, RobotWare and Controller configuring it to match your exact version.
- Check the Customize options box and match the options on your real robot.
- This will now start a virtual controller and instantiate a model of your robot. It may take a minute or two.
- You can now use this robot exactly as you would the real robot using the loopback IP address 127.0.0.1 from the HAL Robotics Framework.
A few extra tips, if things aren’t quite working as expected:
- If RobotWebServices (RWS) isn’t working in your simulated environment, you may need to enable it using the instructions from ABB here. For those experienced with ABB robots and controllers the TL;DR is - activation can be found under Configuration -> Communication -> Firewall Manager -> RobotWebServices -> Enable
- If you want to access your virtual controller from another PC that can be done using the instructions from ABB here.