
Learn how to use the HAL Robotics Framework.
• documentation home• decode
• Grasshopper SDK
• back to main site
• issues and bugs
2. Cell
2.5. Calibrate a Reference or Tool
2.8. Save a Mechanism as a Preset [Coming Soon]
2.1. Insert a Robot
Objective:
In this quick tutorial we’ll take a look how to insert a Robot preset in the HAL Robotics Framework for Grasshopper.
Requirements to follow along:
- McNeel’s Rhinoceros 3D and Grasshopper, and the HAL Robotics Framework installed on a PC.
How to:
Within the HAL Robotics tab, under the Cell panel you will find a component called Robot. When you place this in the document you will notice that it has two interlocking squares ⧉ in its name. This is the symbol for a pop-up window component meaning we can double click on the component to bring up an additional user interface. In this case that’s a catalog listing all of the available Robots we’ve pre-created for your immediate use.
You can use the search bar or tags listed on the left-hand side of the window to filter the Robots to find the one you want. Once you have identified the Robot you want to add to the document simply double click or use the “Select” button to instantiate your Robot in the scene. If you intend to Export code to your Robot it is a good habit to name your virtual Robot to match the real one using the Alias input. For example, the IRB-1200 we have in the office is configured as HAL_Jarvis.
 It is good practice to name HAL objects by using the Alias input of the components.
2.2. Create a Reference
Objective:
In this tutorial we’ll see how to create References in HAL Robotics Framework components in Grasshopper.
Demo Files:
 Create a Reference.gh
Requirements to follow along:
- McNeel’s Rhinoceros 3D and Grasshopper, and the HAL Robotics Framework installed on a PC.
Background:
References are useful because they allow us to specify Targets relative to something other than the world or the base of the Robot. This means that they can be recalibrated in the real world without the need to regenerate a Toolpath or Procedure.
How to:
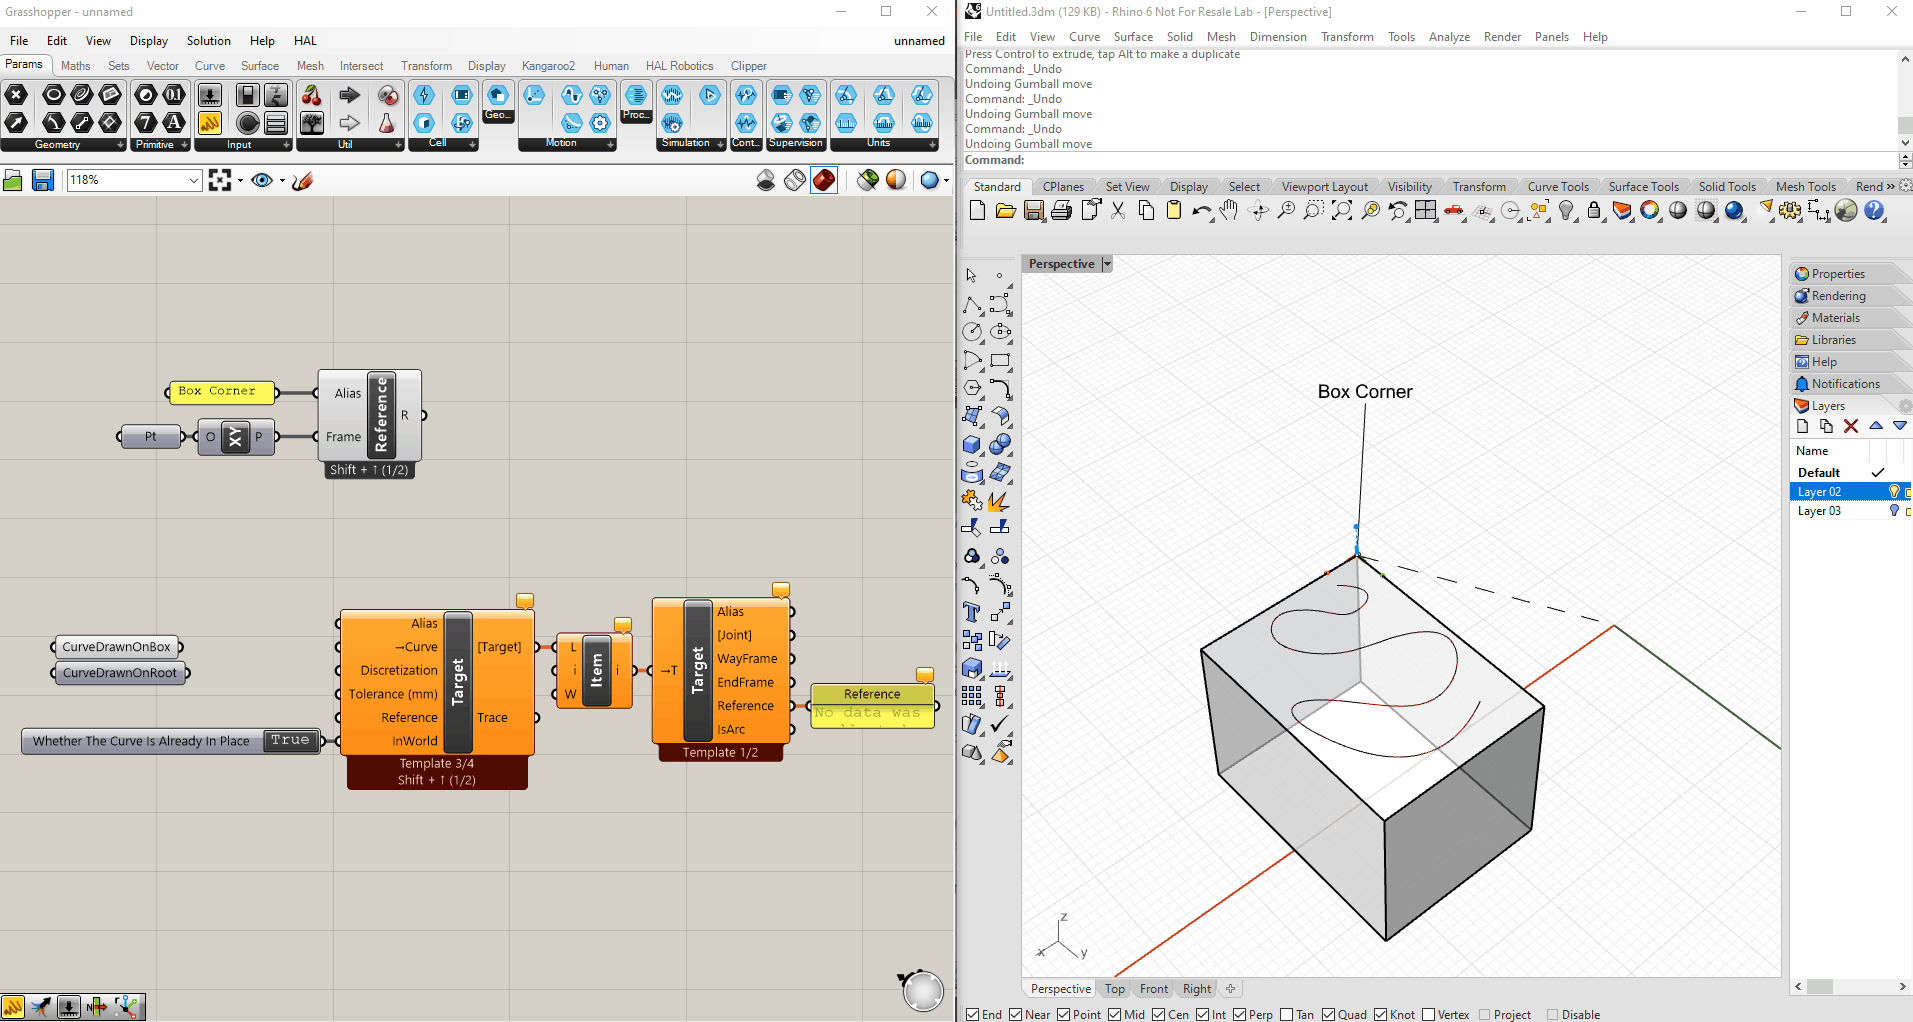
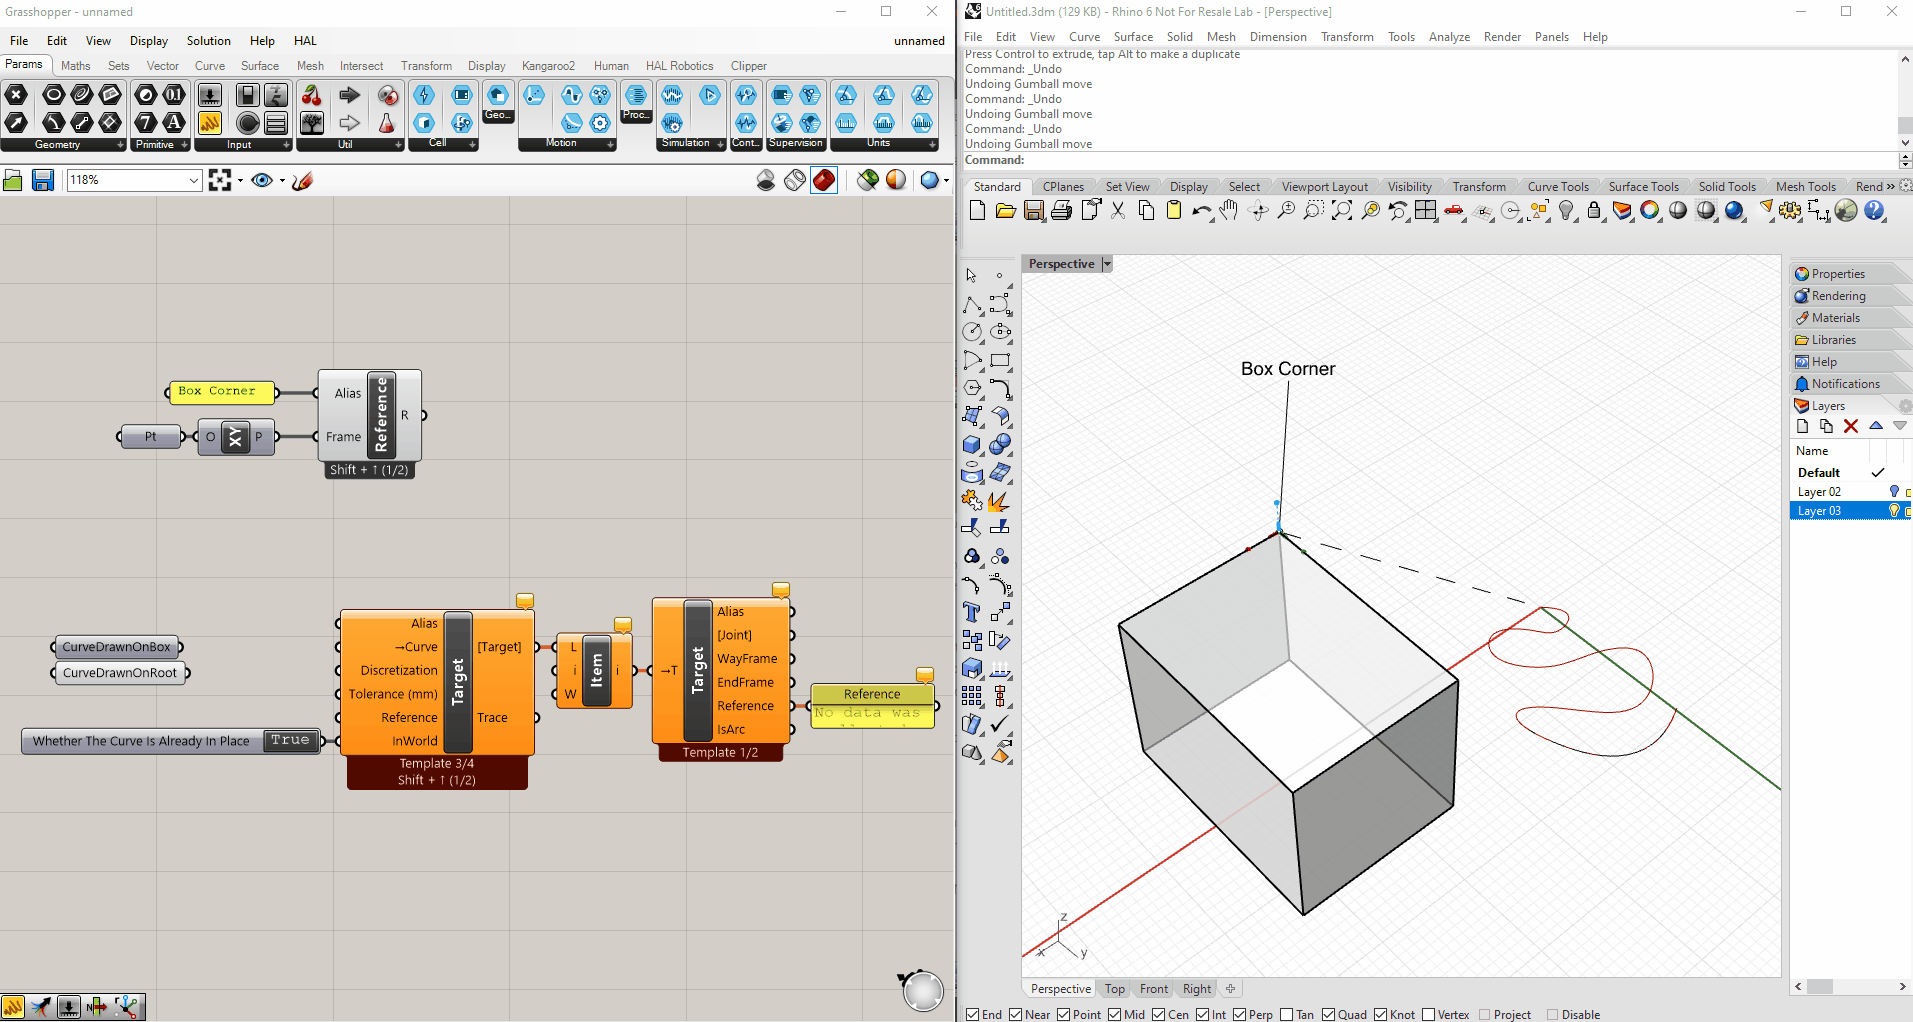
The simplest way to create a Reference is under the Cell panel, Create Reference. Our Reference defaults to the world origin but you can equally select any point from your Rhino or Grasshopper session. In this demo I’m going to use this point on the corner of my box which I’ve previously drawn in Rhino. I’m going to bring that into Grasshopper and assign it as the origin of an XY Plane and the Frame of my Reference. We can see the location of our Reference from these dashed axes with dots at the ends. You can also see that the Reference is labelled. To simplify finding our References later it’s advisable to give them an identifiable name, in this case BoxCorner, using the Alias input.
 It is good practice to name HAL objects by using the Alias input of the components.
There are two main ways to use References, both of which can be demonstrated using the Target component and selecting the From Curve template.
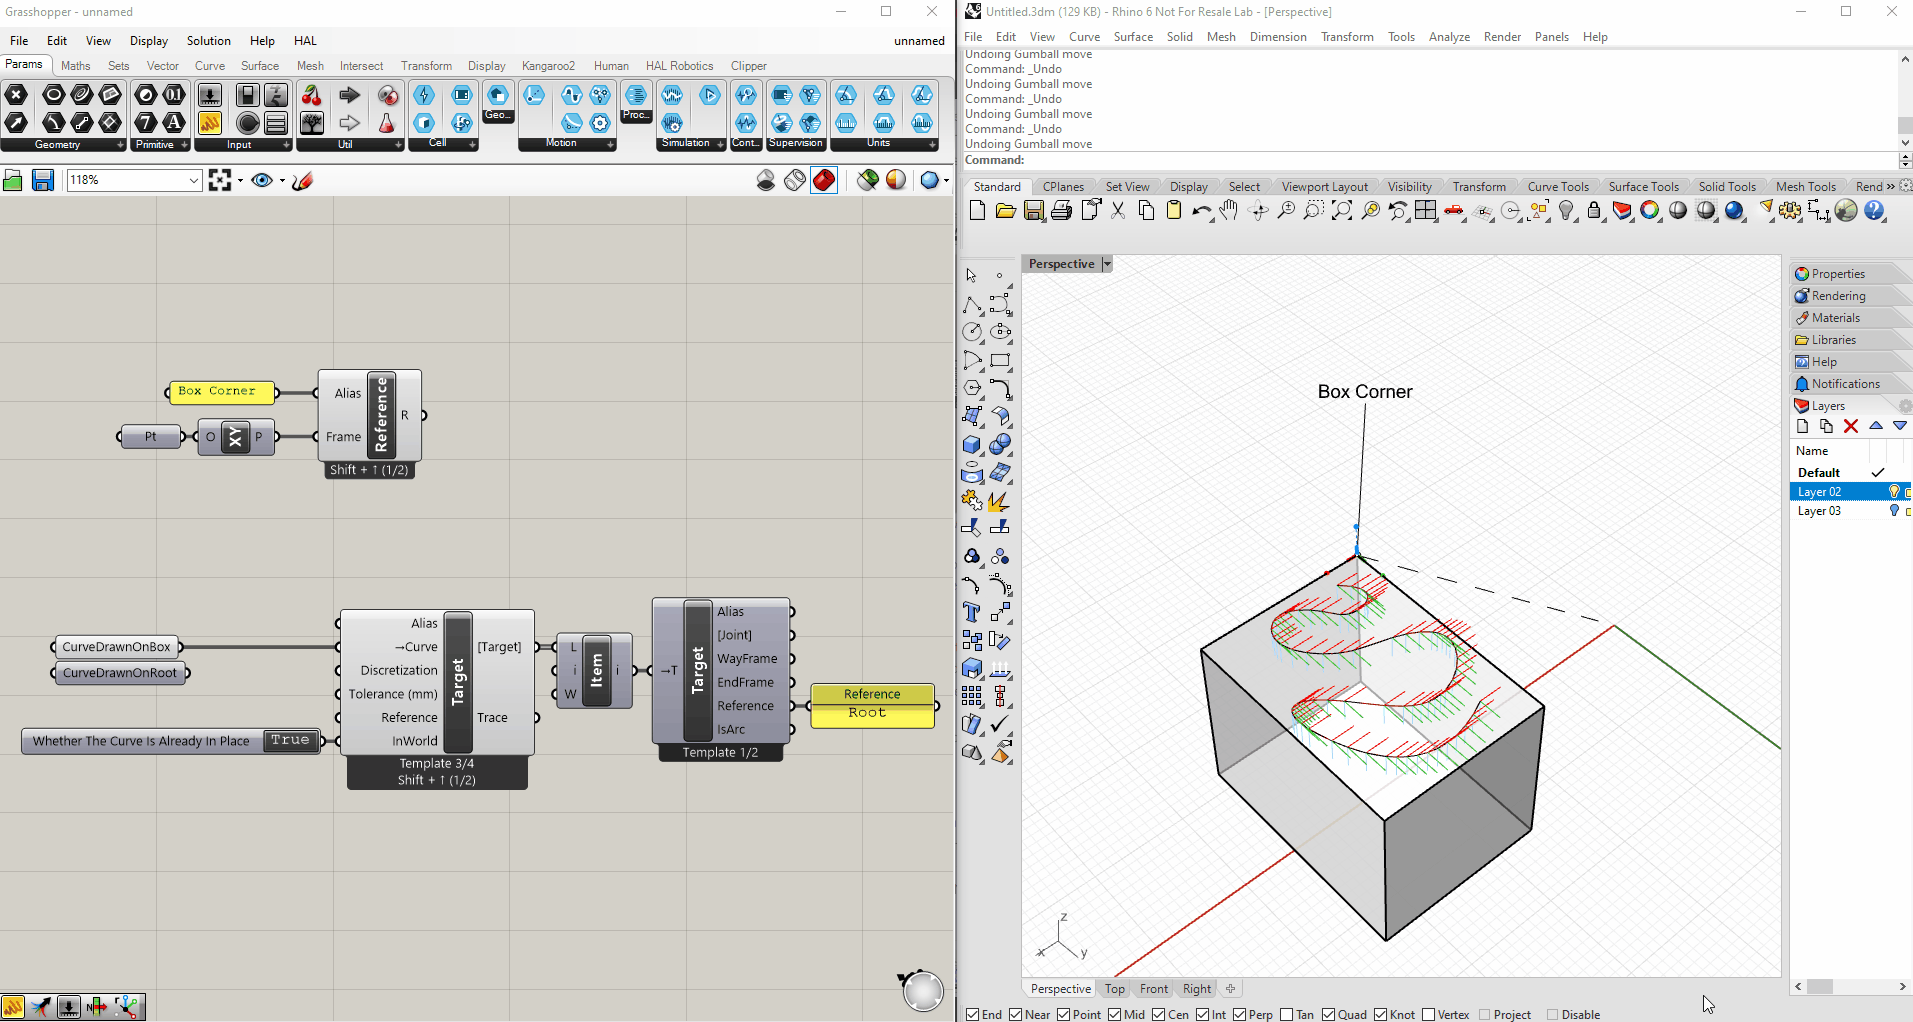
- The first, default, way of using the Reference can be seen by simply selecting a curve already in position in the world. We can see that the Targets all follow the curve as it is drawn, but if we drill down into the Targets’ properties using the Target Properties component, we can see that their References are correctly set to
BoxCorner. If, in this configuration, we move our Reference you’ll see that the Targets do not follow. That’s because the parameter InWorld is set totruemeaning that both the Targets and Reference are in their correct positions in the world and no modifications need to be made.
 Targets created without reference will automatically have the world origin assigned as their reference. Their coordinates will be translated to robot code as they are.
 Targets created with a reference but InWorld will have the reference assigned but their location relative to the world origin won’t change. Their coordinates relative to the reference will be translated to robot code.
- The other way of using the References is with geometry modelled relative to the world origin like this curve. If we set this up in the same way and change InWorld to
falseour Targets maintain the same relative transformation between the world origin and their new Reference. Now when we move the Reference around, the relative Targets follow.
 Targets created at the document origin then assigned to a reference, not InWorld, will follow the reference around the scene treating the reference as their new origin. Their coordinates relative to the reference will be translated to robot code.
References can also be parented. If we create another Reference and use Shift + Up to change overload we can see a Parent input appear and the same InWorld parameter that we saw in Target from Curve. If we use our old Reference as the Parent of this new Reference, add a bit of an offset by assigning the Frame and set InWorld to false we now have a Reference referenced to a Reference. We can reassign the Reference of our relative Targets and see both the new Reference and our Targets follow when BoxCorner is moved. This is of particular use if you have a calibrated work surface but want to perform work in different areas of it.
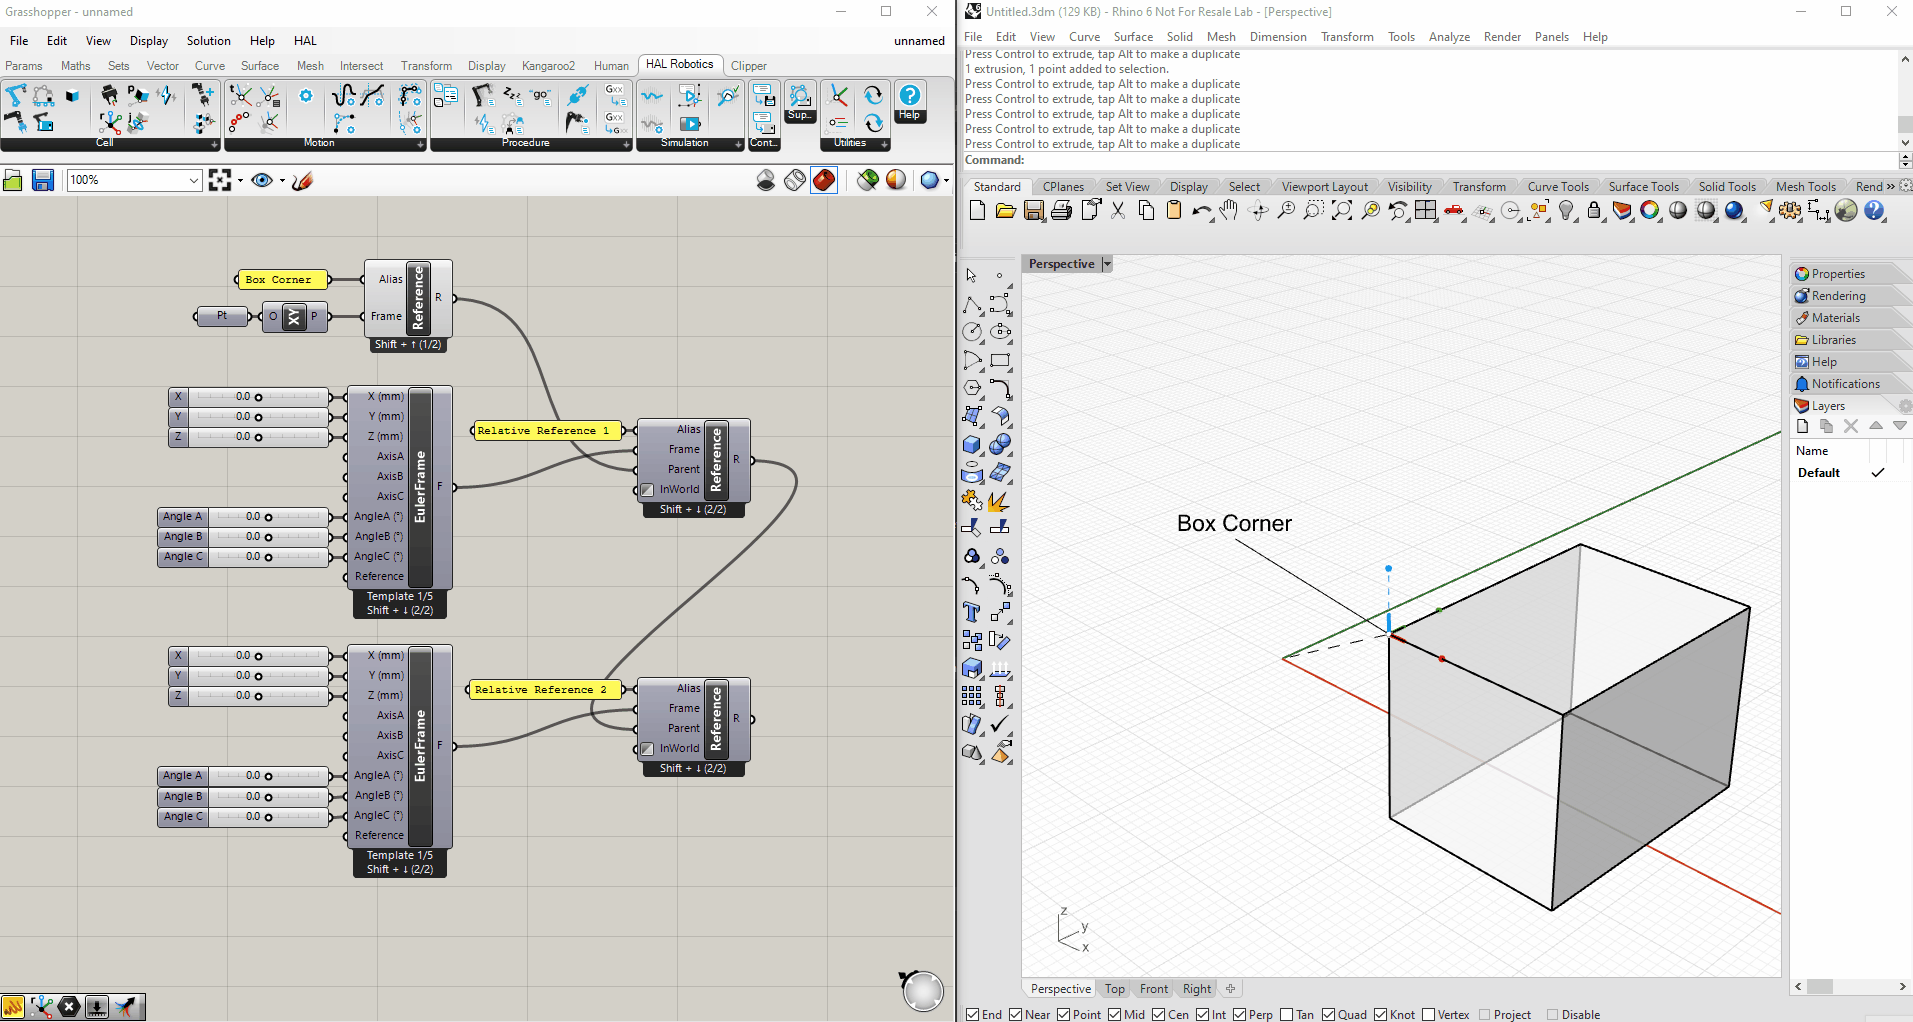 References can be declared relative to each other.
Next:
Take a look at the next tutorial on creating Parts to learn how to add geometry to your References.
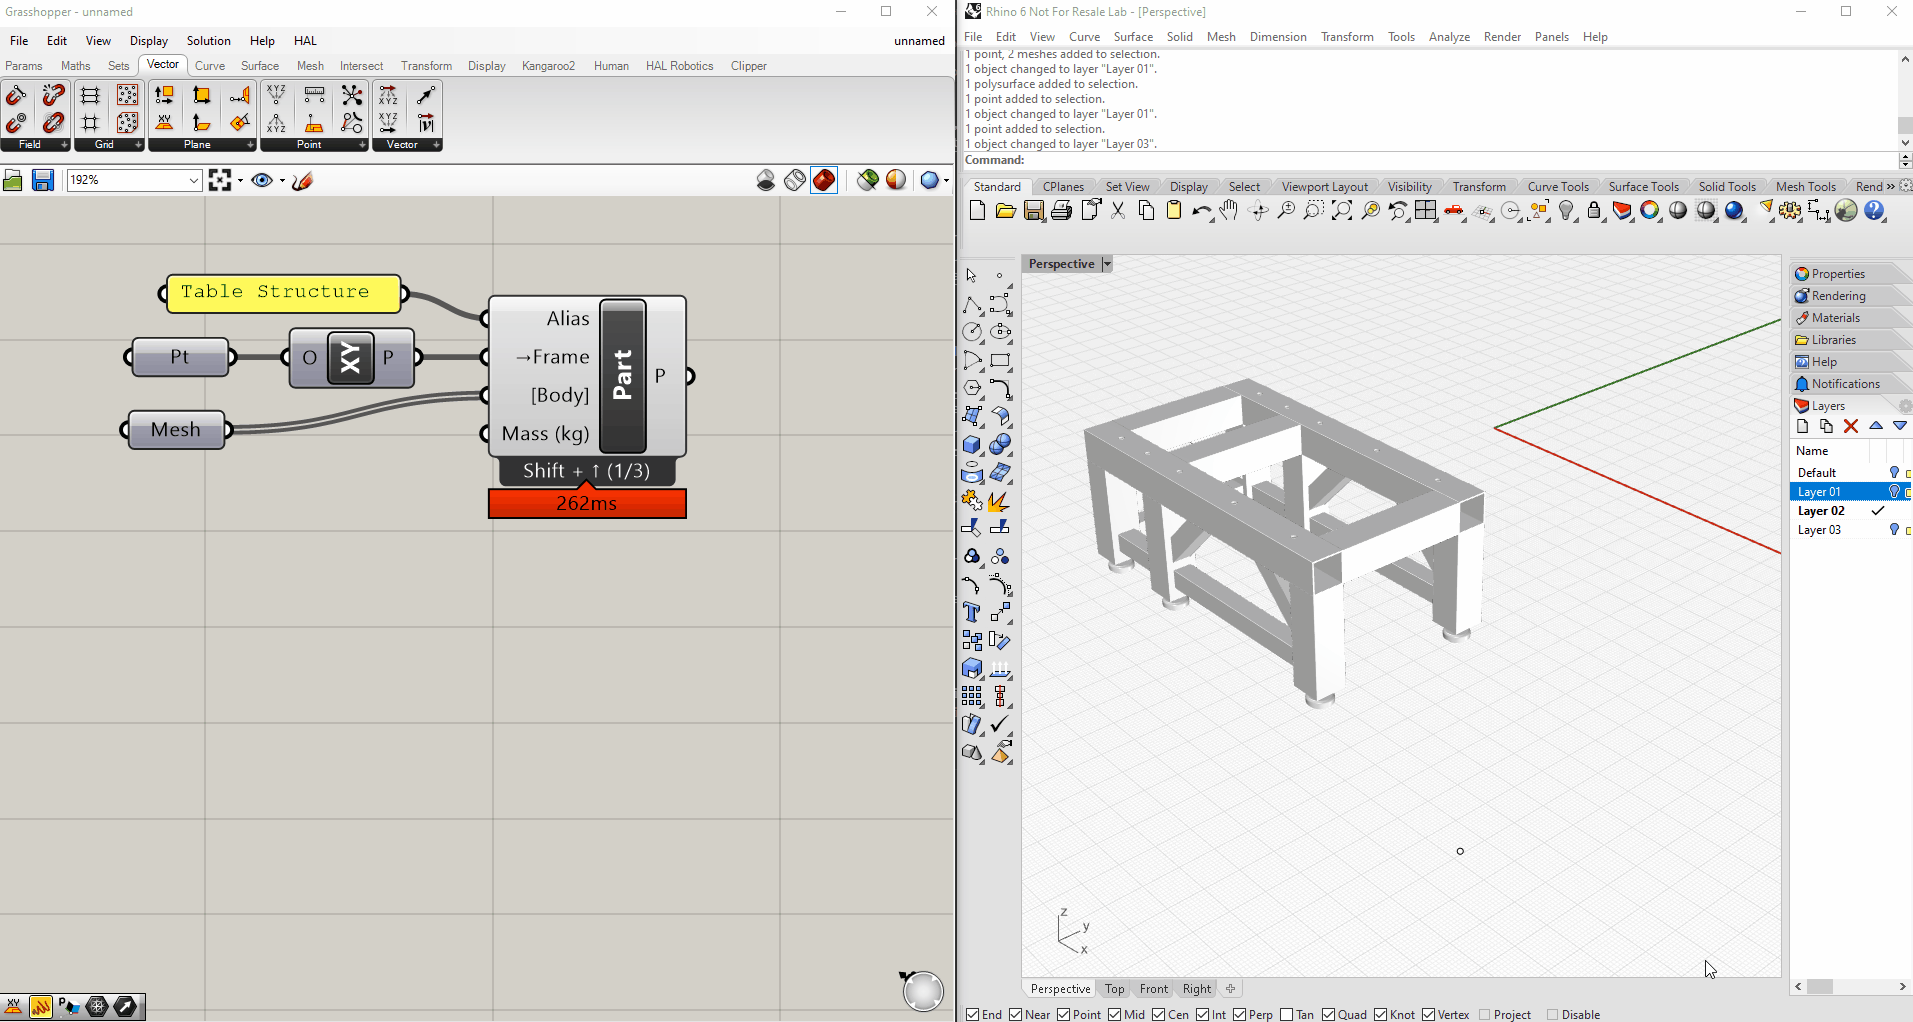
2.3. Create a Part
Objective:
In this tutorial we’ll see how to create Parts using HAL Robotics Framework components in Grasshopper.
Demo Files:
Requirements to follow along:
- McNeel’s Rhinoceros 3D and Grasshopper, and the HAL Robotics Framework installed on a PC.
- Reading or watching the Create a Reference tutorial is highly recommended.
Background:
Parts serve two roles in the HAL Robotics Framework. Firstly, they can be used to populate your Cells with environmental elements such as pedestals, tables or tool holders which can in turn be used as References for your Toolpaths. Parts can also be used as the basis for creating your own Mechanisms such as Robots, Positioners or complex Tools.
How to:
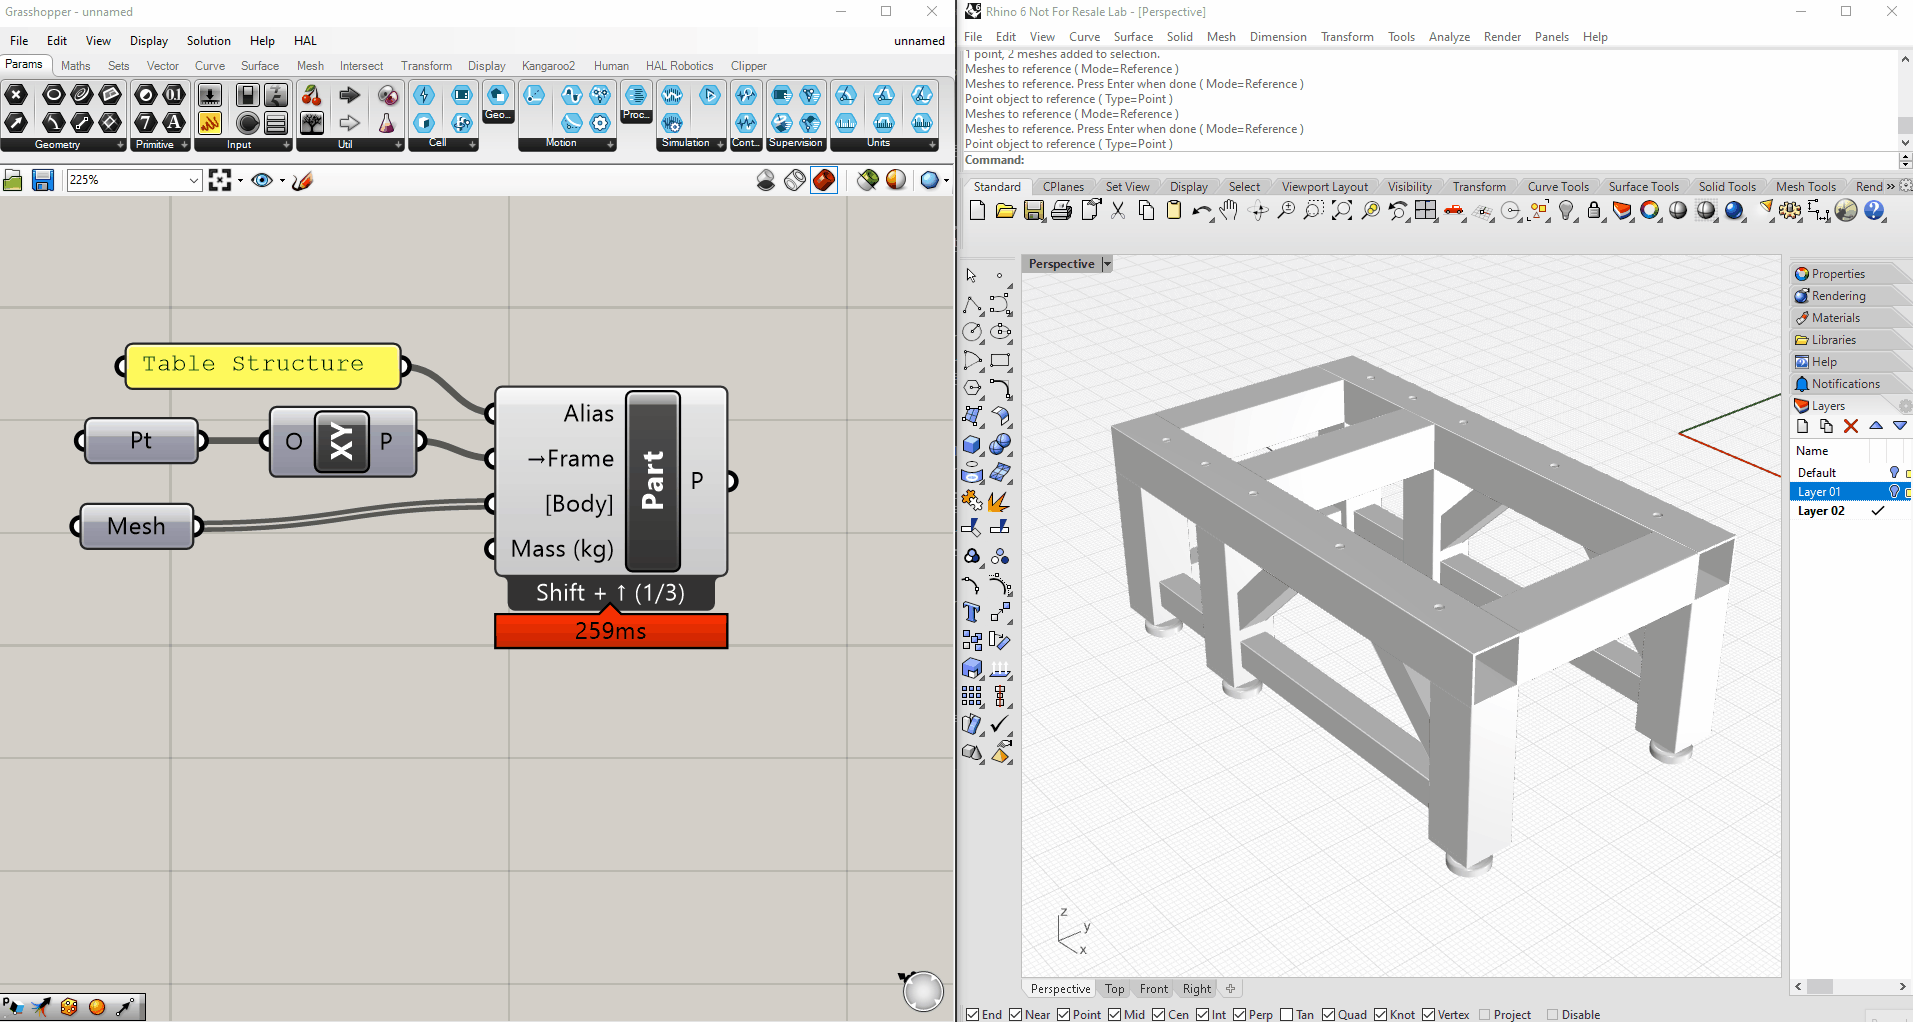
We can create a Part by going to the Cell panel, Create Part. If you’ve seen the Create a Reference tutorial many of the inputs here will look familiar, in its simplest form a Part is just a Reference with associated geometry. The Frame of our Part is its base frame, that is to say if you were to set the position of the Part that is the point that you would expect to be at the designated position. The Body is the geometry we want to assign to our Part, and we can assign a Mass. The Mass is particularly necessary if this part is going to be used as part of a Tool so that the total mass can be calculated and Exported in your code.
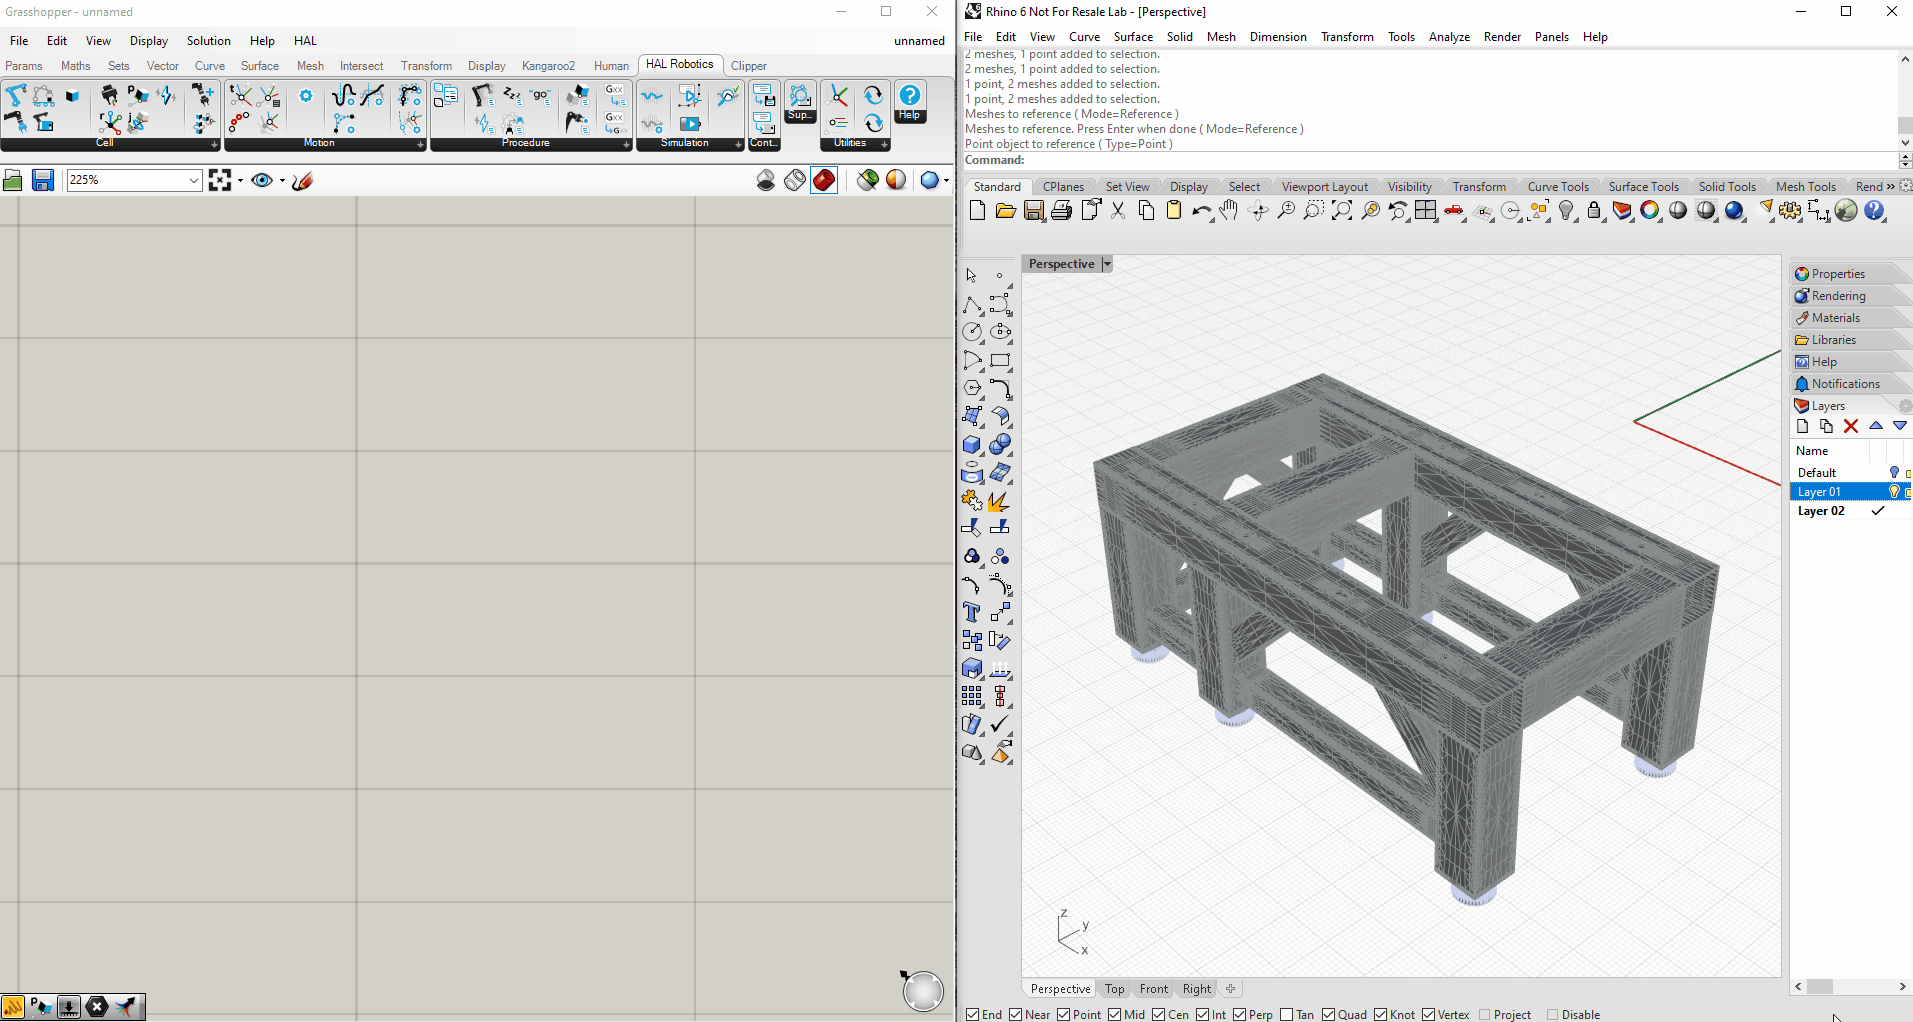 A part is a shape (approximated by meshes) with an associated location an mass.
 The second overload of the Part component allows us to specify a few more details including the Color and Centre of Mass.
 Once you’ve created your Parts they can be moved around your scene using the Relocate component.
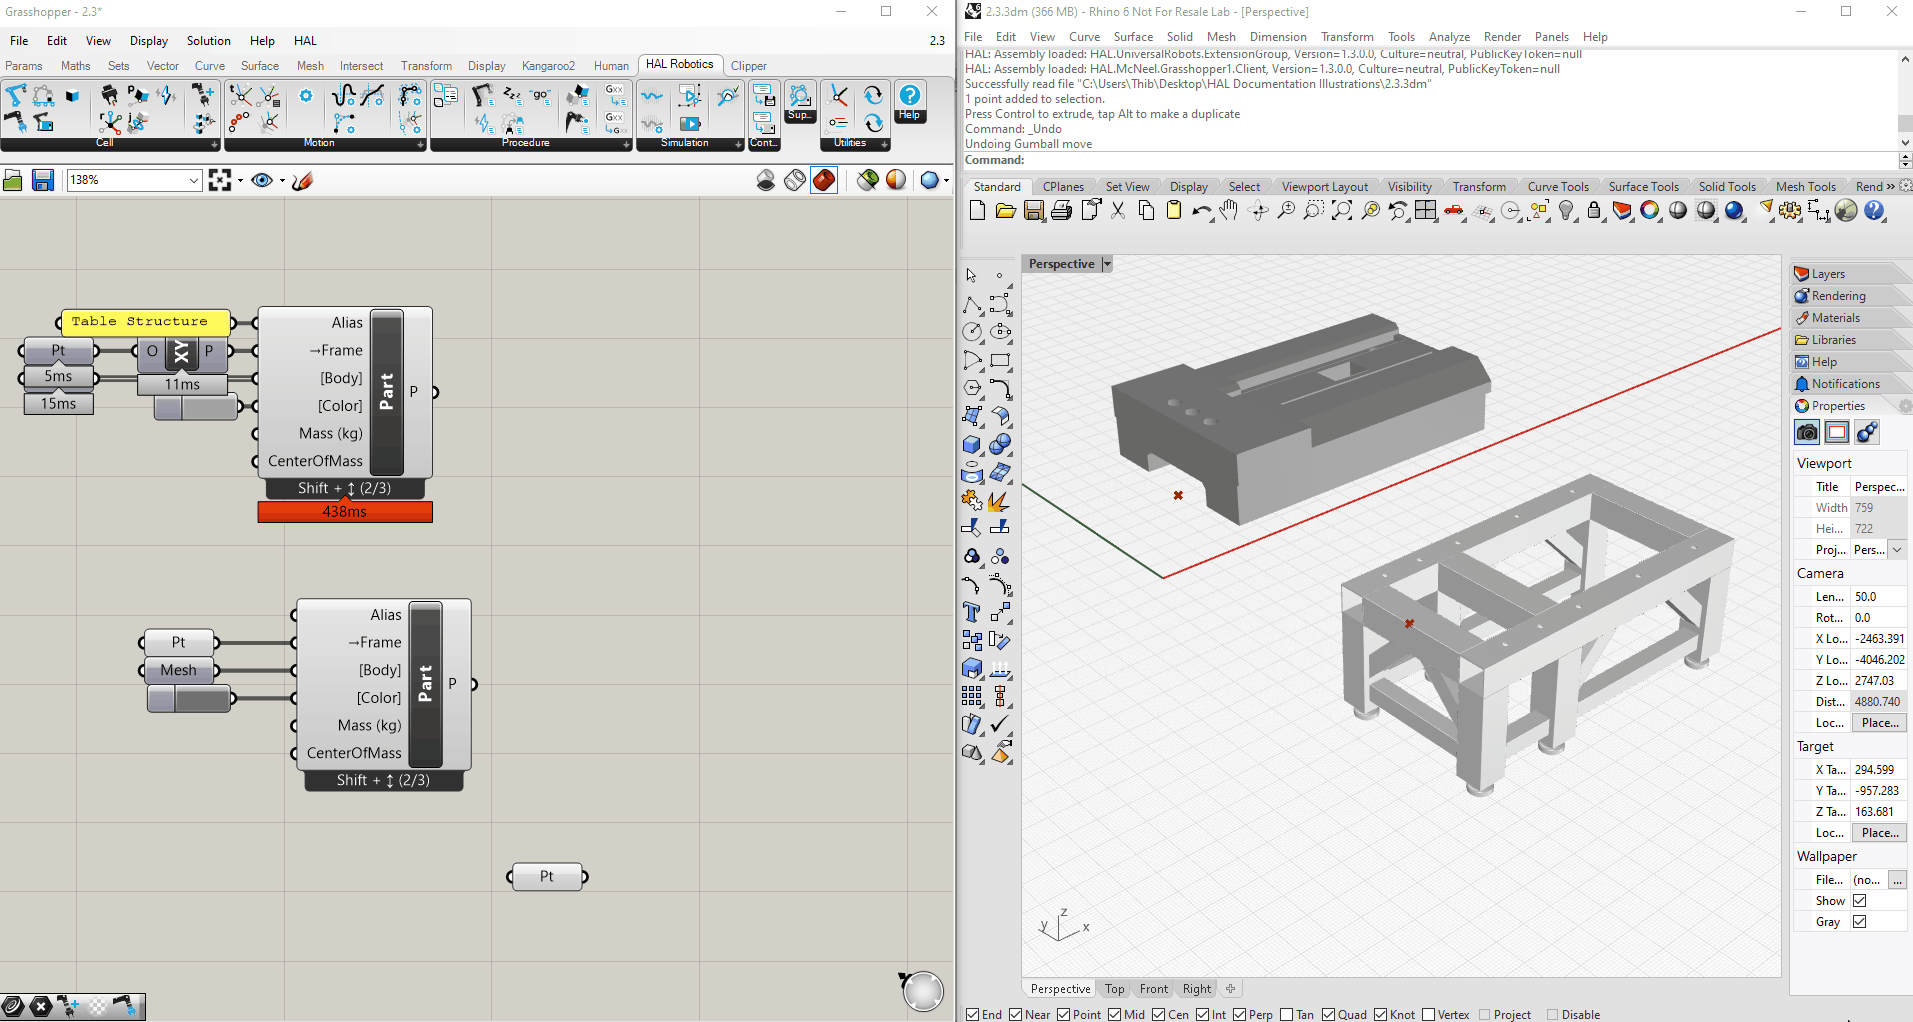 Two parts can also be attached to each other using the Attach component.
Next:
Take a look at the tutorial on creating multi-Part Tools and the creating your own Positioner tutorial to learn how to use Parts in other ways.
2.4. Create a Tool
Objective:
In this tutorial we’ll create a simple Tool in the HAL Robotics Framework for Grasshopper.
Demo Files:
 Create a Tool.3dm
Requirements to follow along:
- McNeel’s Rhinoceros 3D and Grasshopper, and the HAL Robotics Framework installed on a PC.
- Reading or watching the Getting Started tutorial is highly recommended.
Background:
More often than not you will need a Tool or End Effector in your Cell to undertake a process. The Tool could be anything from a welding torch to a spindle or even something as simple as a pen. Tools can be attached to the end of a manipulator like a Robot or stationary with a Robot bringing the Part to the Tool.
How to:
In the Getting Started tutorial we used a preset Tool from the Tool catalog. With the enormous variety of Tools in the world and even the ease with which one can create an entirely unique, custom Tool for a process, chances are good that you will need to model your own Tool within the HAL Robotics Framework. In this demo we’re going to use this pencil holder as an example. The first thing we’re going to do is go to the HAL Robotics tab, Cell panel and select the Create Tool component. If you’re ever in doubt about where to start, it’s often useful to get the component you know you’ll need at the end of the chain and work your way backwards. We can see there is an input of Frame. As with a Part this is the base frame by which the Tool will be connected to our Robot. In this particular scenario our Tool is modelled at the origin and therefore the base frame is the world XY plane. We are then asked for a Body. We can import meshes from Rhino or use any generated meshes from within Grasshopper. We also need a ToolFrame or Tool Centre Point (TCP). In a future tutorial we will see how to import that frame from calibration data in your Controller but to keep things simple here I’m going to use the point at the tip of the pencil in my model. We need this to be a frame rather than a point but this is simplified because the ToolFrame happens to be aligned with the world XY again. We recommend that the Z axis of TCPs point out of the Tool, following the co-ordinate system flow of the Robot itself. Once we connect this to the Tool component, we will see our Tool appear with its TCP labelled. It’s a good habit to hide things as we go to avoid duplicating visualizations. Once the Tool is completed, we can attach it to our Robot using the Attach component as we did in the Getting Started tutorial. With those assembled we can Solve and Simulate the Robot with the Tool attached.
Next:
Take a look at the tutorial on creating multi-Part Tools and the calibrating Tools tutorial to get a more accurate representation of your cell.
2.5. Calibrate a Reference or Tool
Objective:
In this tutorial we’ll bring in calibrated data to improve the accuracy of Tools and References in the HAL Robotics Framework for Grasshopper.
Demo Files:
Requirements to follow along:
- McNeel’s Rhinoceros 3D and Grasshopper, and the HAL Robotics Framework installed on a PC.
- Reading or watching the Create a Tool tutorial is highly recommended as this tutorial builds on its output.
Background:
Tools and References can be digitally modelled with some degree of accuracy but installation and manufacturing tolerances mean that the most accurate data will always come from a calibrated Robot Controller.
How to:
In our previous tutorial we used a theoretical plane as our Tool Centre Point (TCP). To ensure our simulation matches the real world as closely as possible we’re going to swap this out for calibrated data. In this tutorial I am using a 3D printed Tool which is mounted on an ABB arm. I have calibrated the Tool using the real Robot and simply copied and pasted that information into my Grasshopper document. As I’m using an ABB Robot the code imported is in RAPID, ABB’s Robot programming language. Additionally, I have extracted the information I need, in particular the X, Y and Z co-ordinates of the TCP and its orientation as a quaternion because that’s the formalism used by ABB. Converting between different frame formalisms can be complicated but we’ve included the Frame component to make it a breeze. You’ll find Frame under the HAL Robotics tab, Utilities panel. By default, the Frame component comes in as Euler frame. By right-clicking on the component we can see that there are a variety of formalisms on offer to suit importing data from any Robot manufacturer. In this instance we want to select quaternion frame. This first overload of the component asks for the Origin and 4 quaternion components. As we have the co-ordinates of the TCP as individual values, we can switch to the alternative overload of quaternion frame to get X, Y and Z as individual inputs. We need to ensure that the units are correct. ABB RAPID positions are in millimeters so as long as that’s what’s on our inputs we’re ok there. We can now hook all of the imported data into the Frame. Once that’s done, we can replace the ToolFrame we had previously, the simulation will re-Solve and we can see that the TCP is slightly offset from the CAD data, as we would expect from a 3D printed tool with moving parts. When we now Simulate, we can see that our calibrated TCP is hitting all of our Targets not the CAD tool tip.
2.6. Create a Multi-Part Tool
Objective:
In this tutorial we’ll look at how we can create more complex Tools, e.g. those with multiple Parts or Endpoints, in the HAL Robotics Framework for Grasshopper.
Demo Files:
Requirements to follow along:
- A PC with the Rhinoceros 3D, Grasshopper and the HAL Robotics Framework installed.
- Basic modelling skills in Rhinoceros 3D and Vector/Plane manipulation skills in Grasshopper will greatly help preparing your own Tool model.
- Reading or watching the Create a Part tutorial is highly recommended.
- Reading or watching the Create a Tool tutorial is highly recommended.
Background:
Tools can often be approximated to be a single geometric body with a single Endpoint. This is the assumption that’s made in the Create a Tool tutorial to make it really easy to get started. There are also plenty of scenarios, however, where the Tool you have will be composed of multiple Parts or even have multiple Endpoints.
How to:
The first step to creating our Tool is to ensure that we have a 3D model of it at an appropriate level of detail. We need it to be accurate to ensure that our simulations are representative but not so detailed that we take a performance penalty from trying to render high-fidelity moving objects during simulation. Once we have that geometry in place, we need to setup some Frames. These include the base location of each of our Parts, this is the connection point on the Part that you would use to connect it to something else, and the Endpoints. You can use any method of Frame creation here including Grasshopper-native components or the HAL Robotics Framework Frame component. With these in place we can prepare our Parts, see the Create a Part tutorial if you are not familiar with this process. In the demo we have here this leaves us with three Parts, each stacked one on top of the other. We are going to leverage that layering to create the logical Connections between our Parts. To create a Connection, we’re going to use the Create Joint / Connection component from the HAL Robotics tab, Cell panel and switch to the Connection template. Here we can pass in our InterfacePlate Part as the From and we’ll connect To the Camera Part. The Frame here is the point of connection between our Parts. Given the way our demo is modelled, this equates to the CameraBase Frame. As the Frame is not relative to the InterfacePlate Part we’ll ensure that InWorld is set to false. We can repeat this process to connect From the Camera Part To the Gripper Part, again using the GripperBase Frame as the Frame.
That completes the preparation of the physical links but we still need to set our Endpoints. These are actually also Connections so we can start by getting that component again. We can start to prepare the GripperTCP by assigning the Gripper Part as the From and the GripperTCP Frame as the Frame. There are two differences between the Connections we created between Parts and an Endpoint. The first is that an Endpoint has no To, it simply indicates an offset from the From Part, and the second is that we must set IsEndpoint to true. Our GripperTCP Connection should now be ready so we can repeat the same process for the CameraTCP.
At this stage we have a large collection of components of our Tool and we need to assemble them. This is done using the Assemble component, again from the HAL Robotics tab, Cell panel. The cleanest way to feed data into this component is using Merge. This allows us to constantly see which components are being assembled and change the order easily if need be. It’s important that the first component in the Component input is the Part that you want to use as the base of your Tool. For this demo that’s going to be the InterfacePlate Part. Ensure that you have a single list of elements coming out of your Merge and we can feed that into Assemble.
At this point you should see your Endpoints labelled in the 3D view and you are free to use this Tool exactly as you did the preset Tool in the Getting Started tutorial or your first custom Tool in the Create a Tool tutorial.
See the Change a Tool at Runtime tutorial to see how to switch between your Endpoints during the execution of a Procedure.
2.7. Create a Positioner
Objective:
In this tutorial we’ll be modelling a Positioner, in the form of a 2-axis rotary table, in the HAL Robotics Framework for Grasshopper. The principles used in this tutorial apply to all forms of Mechanism including Linear Positioners, like Tracks, and Manipulators.
Demo Files:
Requirements to follow along:
- McNeel’s Rhinoceros 3D and Grasshopper, and the HAL Robotics Framework installed on a PC.
- Basic modelling skills in Rhinoceros 3D and Vector/Plane manipulation skills in Grasshopper will greatly help preparing your own Positioner model.
- Reading or watching the Create a Multi-Part Tool tutorial is highly recommended as this tutorial builds on some of its learnings.
Background:
Positioners can greatly extend the capabilities of your Cell by moving your Robot or Part to facilitate access for processing. We provide a number of preset Positioners, however, Positioners are highly customizable and it’s even possible build your own so it may be necessary to model your exact configuration for use in the HAL Robotics Framework.
How to:
The first step in the creation of a Positioner is to ensure we have an accurate but simple model. If you’re preparing something entirely custom you are likely to already have a 3D model of the positioner, however, if you’re recreating something provided by a manufacturer then you will need to try and find the model on their website. Most manufacturers provide very good models of their equipment so this shouldn’t be too difficult. In this demo I’ll be working on an ABB IRBP A-250, a two-axis, rotary positioner. I have downloaded a surface-based model from the ABB website as this is easier to manipulate than meshes at the start of the process. The model provided by ABB is highly detailed and, although a detailed model looks great, a lot of the detail included is surplus to requirement for kinematics and simulation. To ensure we get smooth performance from our model of the IRBP A-250 I’ve removed certain details like bolts, holes, cable connectors and even a few fillets in unseen areas. I’ve then meshed this simplified geometry and simplified those meshes to find a balance between fidelity and visual quality. Reference those meshes into your Grasshopper file and group meshes that are physically, statically joined together.
With our geometric model in place we also need to ensure we have certain data like the positions and limits of each Joint. The limits should be present in the datasheet for your Positioner but the rotational centres for the Joints may not be so easy to come by. If you have the exact locations, add them to your Grasshopper file as individual points. If you can’t find or obtain that information then you can always make an educated guess based on the geometry you have. One way of doing that is by working with circles or other primitive curves. I have added a number of circles around geometric elements that rotate using the snaps of Rhino and add a point at the centre of each of those circles to estimate the centre of rotation for the Joint. Reference those points in to the Grasshopper document and we’re ready to convert them into Frames. Using the in-built vector and plane tools of Grasshopper or the Frame component from HAL Robotics -> Utilities we need to create a Frame at each Joint with the Z-axis acting as the centre of rotation. That concludes the geometric modelling phase of this process.
With our meshes and Frames in place we can now create our Parts. We have already covered this in the Create a Part tutorial so I won’t cover it again here but remember to name your Parts appropriately to simplify debugging later.
From here we need to start connecting our Parts together using either fixed Connections or Joints. Both of these are found in Cell panel in the Create Joint / Connection component. Within that component you will find templates for Revolute Joints, Prismatic Joints, and Connections. I’m going to start with a Connection to join the headstock to the base structure. I could have made these into a single Part but, personally, I like to approximate the mechanical assembly and these are clearly different parts from that point of view. Next, we have the first Joint which connects the headstock to the swing arm. I can connect the Parts into the component with From being the Part that is stationary for the Joint and To being the Part moved by the Joint. I can also bring in my Frame that we prepared earlier and Positions and Speed from the datasheet. I find it easier to work in degrees rather than radians for this kind of model so I use the Unit on those inputs to keep things legible. We follow exactly the same process for the second Joint. The final element we need to add to this before assembling everything we’ve done so far is add in the Flange. This is the Endpoint that a Mechanism uses when no Tool is mounted. This can be created as a Connection with no To Part defined and IsEndpoint toggled to true. Best practice dictates that the Frame of the Flange should always point out of the end of the Mechanism. If you want to have a Part or Tool attached to the end of the Positioner, this should be added after assembly of the Mechanism.
With all of the elements in place we can merge them all into a single list and pass that list to the Assemble component which can be found in the Cell panel and takes all our Parts, Connections and Joints in the Component input. It’s important to note that the first element in the list must be a Part as this will be used as the base of the Mechanism and you must have at least one Connection marked as an end point. We can now see our Positioner and use it exactly as we would any other Mechanism by creating a Procedure and/or Targets for it. Please see future tutorials (1,2) to see how this can be used in conjunction with another Mechanism to create a multi-Mechanism Cell and how to save this Mechanism as a preset that can be shared with your colleagues or peers.
If you have created a Track, you can mount a Robot onto it using the Attach component exactly as you have done Tools in previous tutorials, ensuring to keep IsEndEffector set to true. This is covered in more detail in the Using a Track tutorial.
If you have assembled an external Positioner, like a rotary table, then this can be programmed in the same way as a second Robot. This is detailed in the Synchronize Motion and Coupled Motion and Resolving Targets tutorials.