
Learn how to use the HAL Robotics Framework.
• documentation home• decode
• Grasshopper SDK
• back to main site
• issues and bugs
1. Getting Started
1.0. Introduction
Welcome to decode by HAL Robotics!:
decode’s primary purpose is to give operators, those with expert process knowledge, enough agency to adapt a robot’s task without burdening them with the complexities of programming. For system integrators and roboticists, however, it serves as a means of quickly setting up complex robotic toolpaths, simulating and validating those procedures, and then sending them as native robot code to your machines.
decode is built on top of the HAL Robotics Framework which has been in use for nearly a decade in different guises within multi-nationals, SMEs, research institutions and academia. That being said, we always recommend erring on the side of caution when using physical hardware and running simulations in OEM tools wherever possible to ensure everything works as expected. Please also read the next two sections which cover known limitations and feedback procedures.
Current Limitations:
- We use McNeel’s Rhinoceros 3D and Grasshopper as a visualisation engine within decode and as such it will need to be installed before you can install decode. We are working with McNeel to automate this process for you and will be working with them to simplify the licensing of the complete software so that there’s a single point of entry, account management etc. when using decode. If you haven’t received your Rhino license with decode (and your license includes one) please contact the HAL Robotics team by email.
- We are currently limiting the cells to one robot with one tool and no external axes/positioners. Multi-robot, positioner, tool change and stationary tool support are all in our development pipeline but if you need any of these features today, we recommend our visual scripting SDK.
- We release meaningful feature updates, tweaks and fixes as necessary so please ensure that updates are installed if you do encounter any other issues.
Feedback:
We always appreciate your support helping us make decode a stable interface that you can trust for your development needs now and hopefully long into the future. If you find any bugs or issues please let us know, preferably through our GitHub issues or discussions so that anyone else with the same experience can chime in and, if need be, help us pinpoint the source of the error. Please give us as much detail as possible as that will ensure we can reproduce the problem internally and therefore identify, and fix, the root cause rather than the symptom.
We would also be very receptive to anything that could make your experience better. That could be features you’d like to see, interactions that could be improved or any other suggestions you have. Again if those go through our GitHub page then we can have an open discussion about how those would work and get input from others on the same subject.
Of course, if you have anything nice to say about decode then we’d love to hear that too, on GitHub, by email or in whatever public forum you feel is appropriate.
Where Next
If you are new to our software, we would recommend starting with the Installation tutorial which will get you up and running.
1.1. Projects
Objective:
In this tutorial we’ll see how to create a HAL Robotics decode Project so we can start programming robots.
Requirements to follow along:
- HAL Robotics decode installed on a PC. See Installation if you need to install the software.
Background:
decode will enable you to prepare a complete robot programming environment and we store all of the data associated to that environment in a Project. The Project is a folder with a series of files, each of which holds different information about the environment you’ve created or are using.
How to:
Once you’ve opened decode, and logged in to the HAL Robotics Framework to access your licenses, you should be presented with a list of Projects that are stored on your PC. If this is the first time you’re opening the software, this list may well be empty. By default, all your Projects will be stored in a folder within you Documents folder but you can change that by clicking on change projects folder in the bottom right-hand corner of the window. If you want to shared Projects between multiple computers, you could set this folder to be somewhere on a networked drive.
If the Project you want to open is listed, you can open it by either double-clicking, or clicking once to select, then on the open button.
If this is your first Project or you want to start a new Project, click on the new button in the upper right-hand corner. This will take you to a new screen where you can give the Project a Name and Description to help you identify it in the list next time you open decode. The Name will also be the final part of the Destination path and we will alert you if that Name is already in use.
Once you’re happy with those details, click ok. We will create that Project for you and automatically open it ready for you to start your new endeavour.
1.2. Structure
Objective:
In this tutorial we’ll outline decode’s structure to ensure you have a high-level understanding of the steps required to work with it.
Background:
decode’s ultimate aim is to provide an operator, Robot(s) and any other peripherals with a set of shared work instructions. These instructions will guide the operator through their task and ask them to make decisions about how the robot’s process(es) should be undertaken, combining the operator’s intelligence and expert knowledge with the speed, accuracy and tirelessness of the Robot. To get that setup, there are a few steps you’ll need to go through.
The decode tabs.
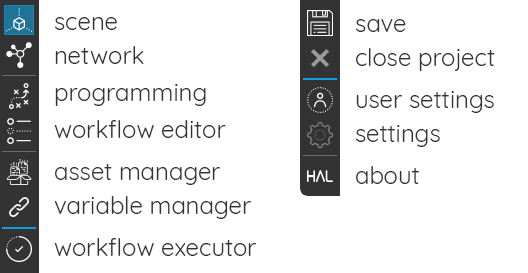
First is the Cell Setup. This covers everything you’ll need to build up a virtual version, or digital twin, of your robotic Cell. This includes selecting your Robots, Tools, References, and Parts as well as set up your I/O Signals and assemble all of these into a complete digital system through a Controller. This is done in the Scene and Network tabs, the first two in the list on the left-hand-side of your screen.
Then comes Programming. This is the next tab down and will allow you to define the Procedures which tell the Robots in your Cell what to do, and how they should do it.
With a virtual Cell and Procedures in place, we can start working on the Operator Workflows. These contain the instructions for the operator and the Cell and could include things like asking the operator to load a Part, asking the operator how fast the robot should go on the next run, or start the execution of the Robot’s Procedures. Operator Workflows are created in the Workflow Editor tab, and run from the Workflow Executor tab which is just after the blue line, and the only one an operator should need.
The two tabs we’ve glossed over are for the management of Variables and Assets. They aren’t part of the core flow but are useful when you need them so it is worth reading up on them below.
1.3. Interface Overview
Objective:
In this tutorial we’ll take a look at the layout of decode and the common patterns you’ll find throughout the software.
Background:
On the far left hand side of decode, there is a set of vertical tabs. Each of these tabs will take you to a new screen with a different purpose, each of which is outlined above in Structure. To the right of the screens is your 3D viewport. That will show you the scene that you’ve built including all of the components of your Cell, your Procedures and your Simulations. You can move around/pan in the viewport by pressing and holding the left mouse button, and rotate/orbit by pressing and holding the right mouse button.
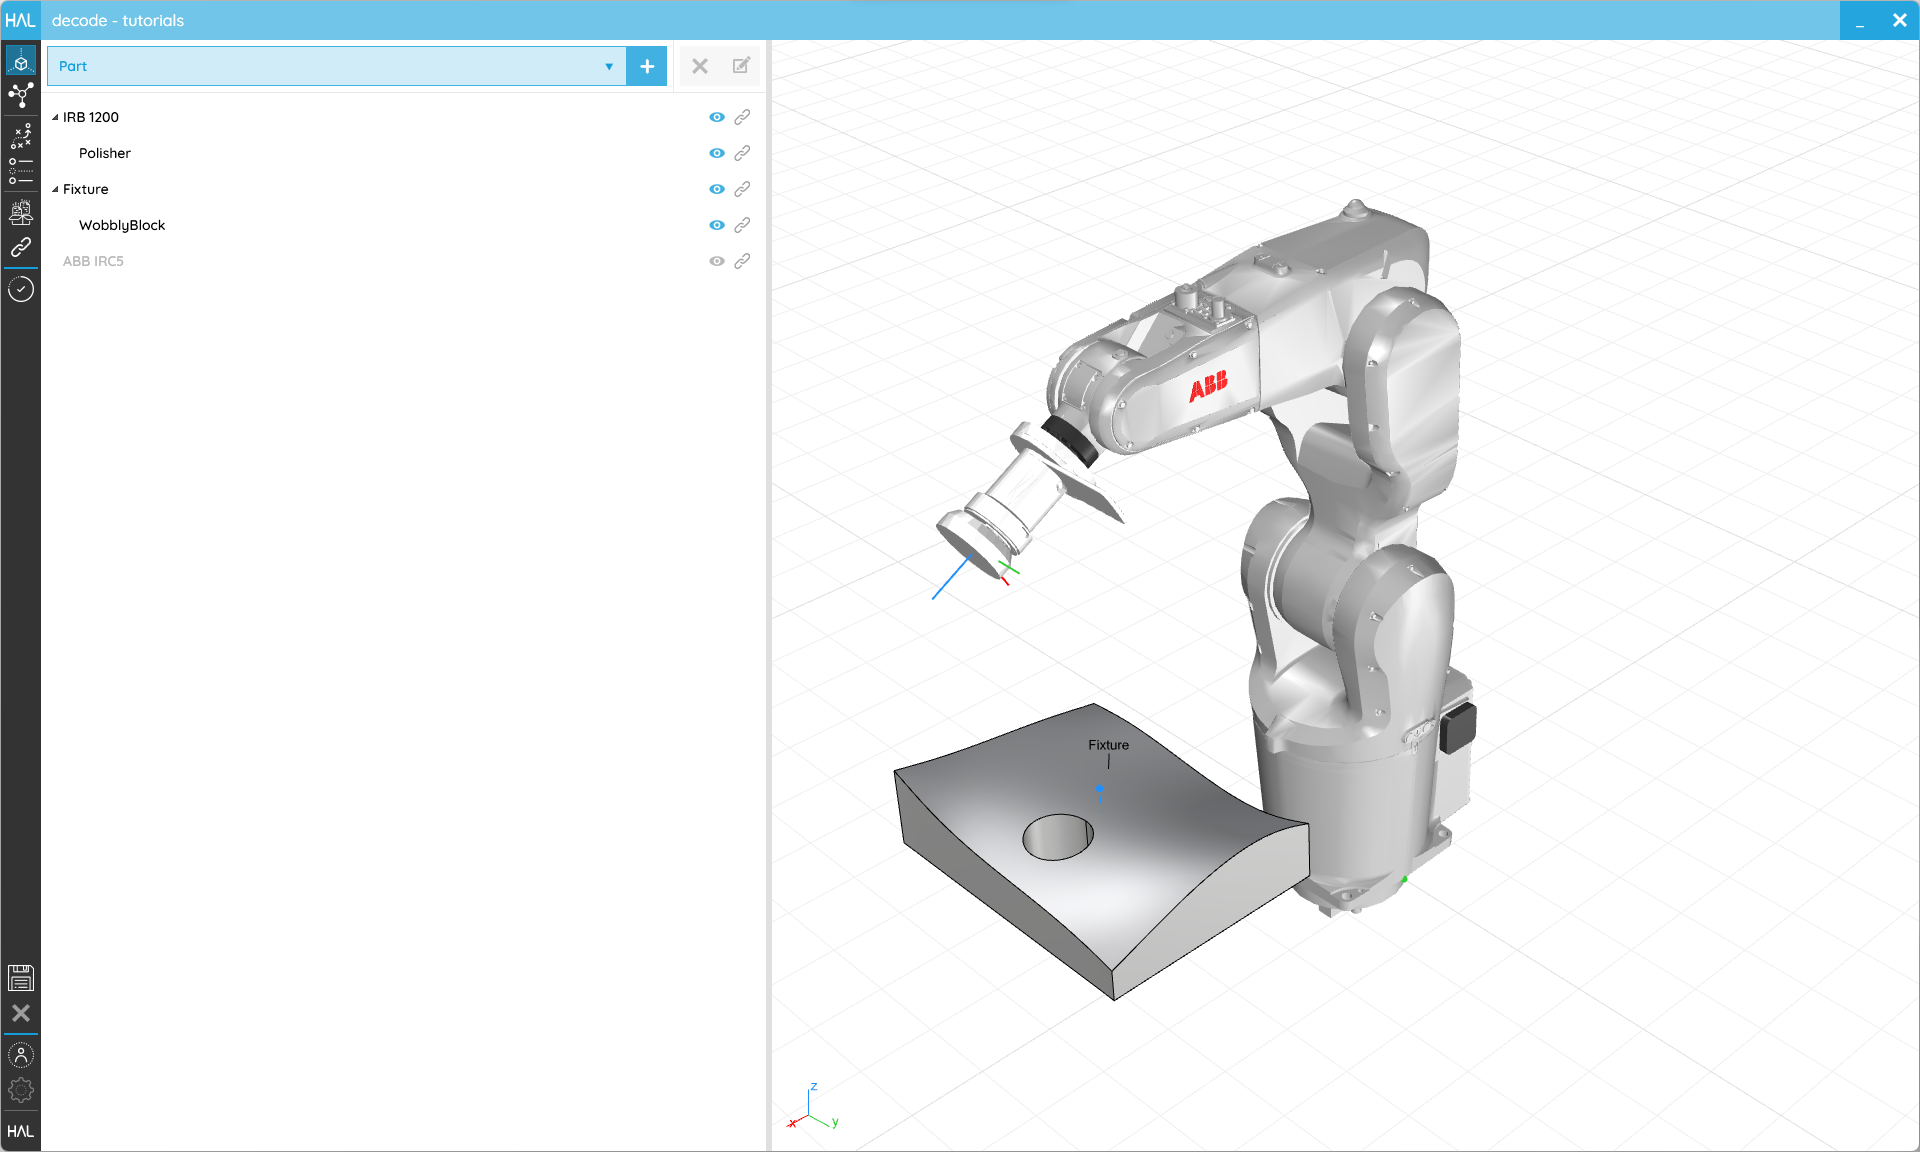
The actual content of each screen will vary depending on what it’s designed to configure but as a general rule you’ll find a collection of items that can be created, edited, manipulated or deleted. The colour of those items will indicate their state. Let’s use the scene screen as an example.
At the top of the screen you’ll see the Item Type selector which allows you to specify the kind of item to create. It’s important to note that the options in the selector are contextual, that is to say, they change based on what is selected in the rest of the screen and potentially any existing content. For example, you can’t attach anything but a Tool to a Robots or anything at all to a Controller. This is because whatever you add next will be a child of the selected item but you can deselect the current item by clicking in any part of the screen’s white space. Next to the selector is a + which will add that item to scene and open it up for editing straight away. Once you’ve added a few items to the scene, you can change their order or who is attached to whom by dragging and dropping the items. Drag and drop behaviours are also contextual, so if you can’t drop an item somewhere it’s likely for a good reason.
The decode scene screen.
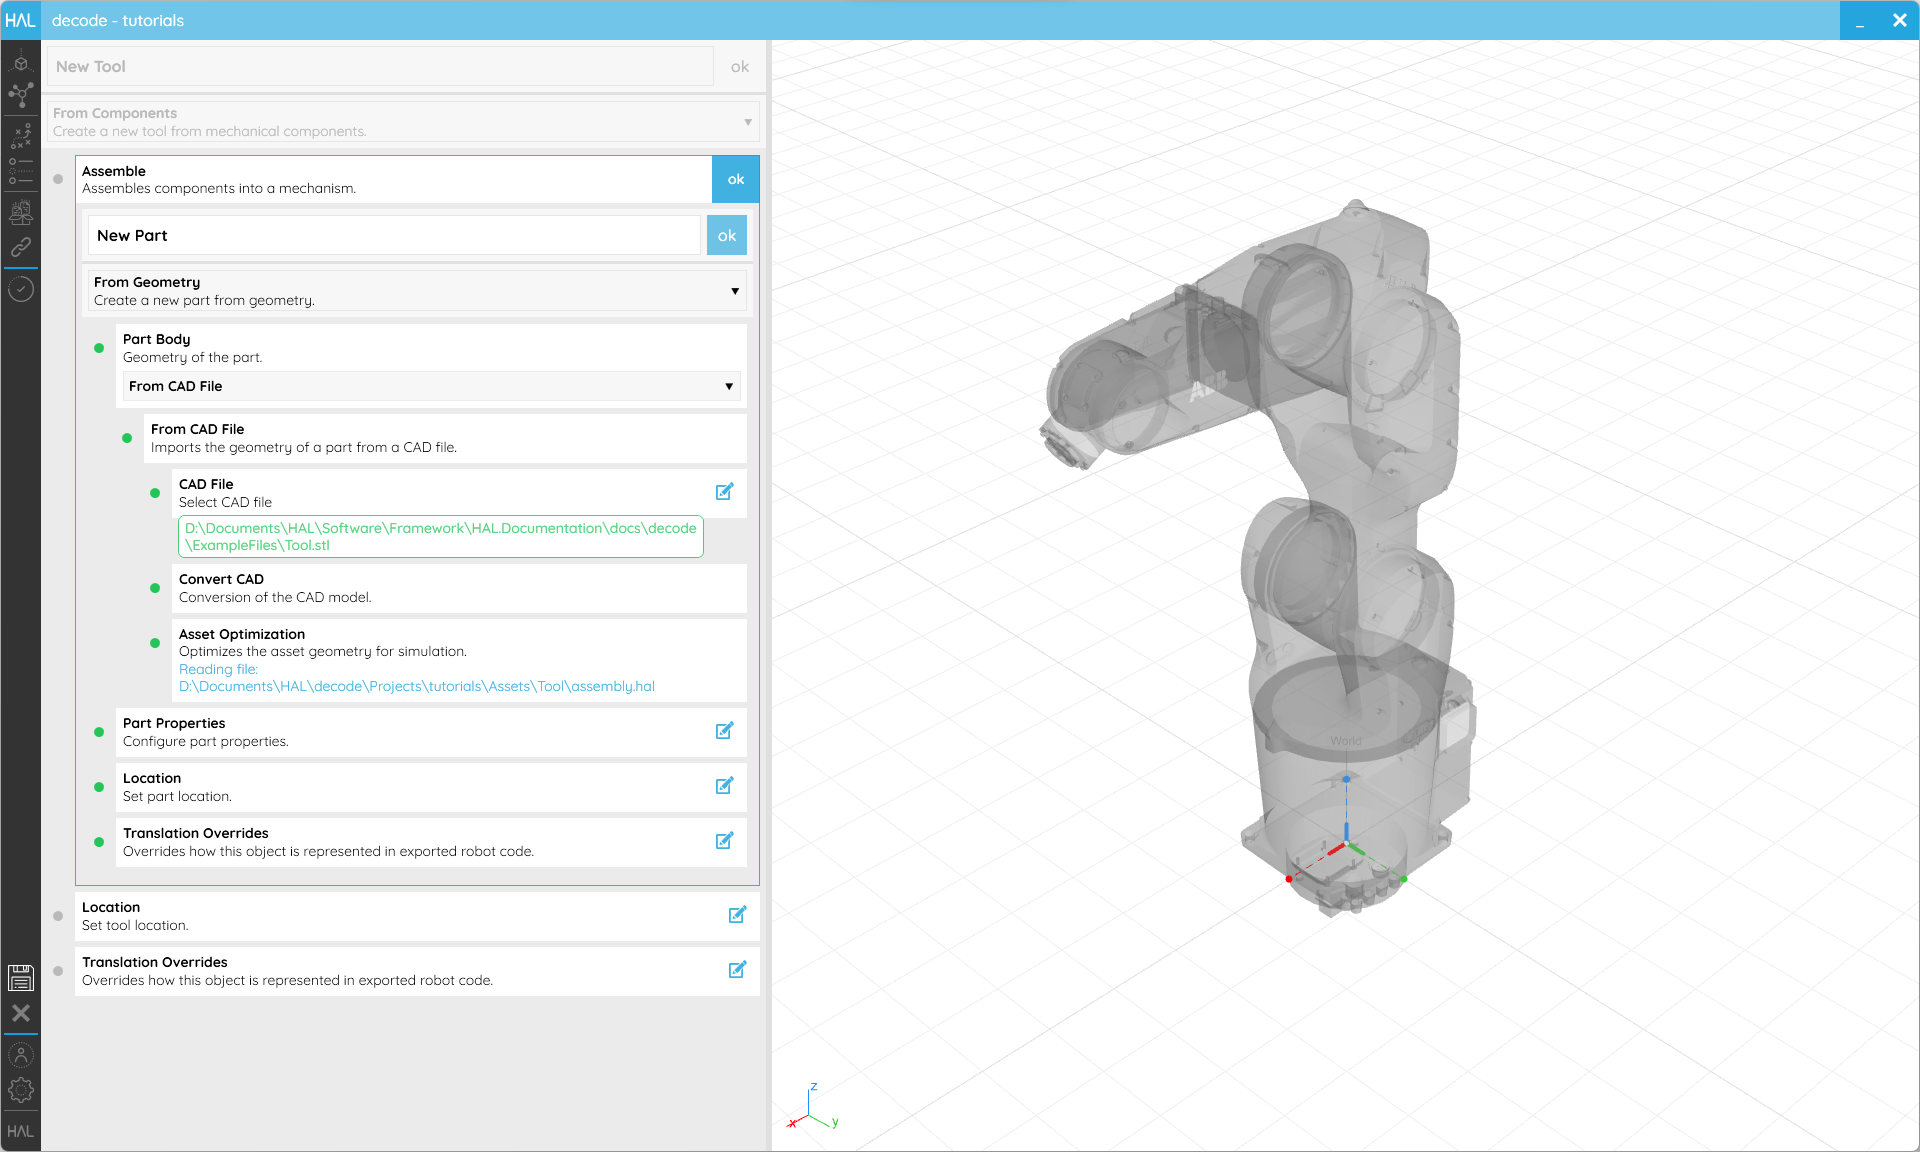
If we add a Reference we can see a standard item editor screen. At the very top is the item’s Name. This can, and should, be changed to identify the item more easily and, in the case of items that get exported to robot code, will be the exported name. You can also rename items from the main screens by right-clicking on them or selecting them and pressing F2. The ok button here finishes editing of the item and closes the editor. You can always return to an editor by double-clicking the item or selecting it and using the edit icon in the top right-hand corner of the screen. Immediately below that top row is a Creator selector. This allows you to choose how you want to create the item. In the case of a Reference, the choices are From Location or From Variable. Each Creator has a Wizard which contains a series of Steps that configure the item. Each Step has a coloured dot on its left which indicates whether running the Step succeeded or not. Its border will also change colour if the data you have input isn’t valid. If that’s the case, it will need to be fixed before we attempt to run the Step again. Some Steps have default values which means they are valid when created, others don’t and will need to be edited before anything can happen. Any Step that can be edited has an icon to indicate that fact. Any other Steps are uneditable. You can start editing the Step by clicking anywhere on the Step but only one Step can be edited at a time.
The decode Reference editor.
Locations
By clicking on the Location Step, we see a fairly standard editor view. Some settings require selections from a list of options, others are numeric values and they should make sense in the context. Hovering over the setting’s name should give you some additional guidance if you need it. By changing the Position or Rotation values you’ll see the Reference in your scene move. We provide this kind of immediate visual feedback wherever possible and that means that changes are immediately applied. If the setting has a 🔗 symbol, it means that setting can be linked to a Variable which you can find out more about below.

The decode Reference editor with the Location Step being edited.
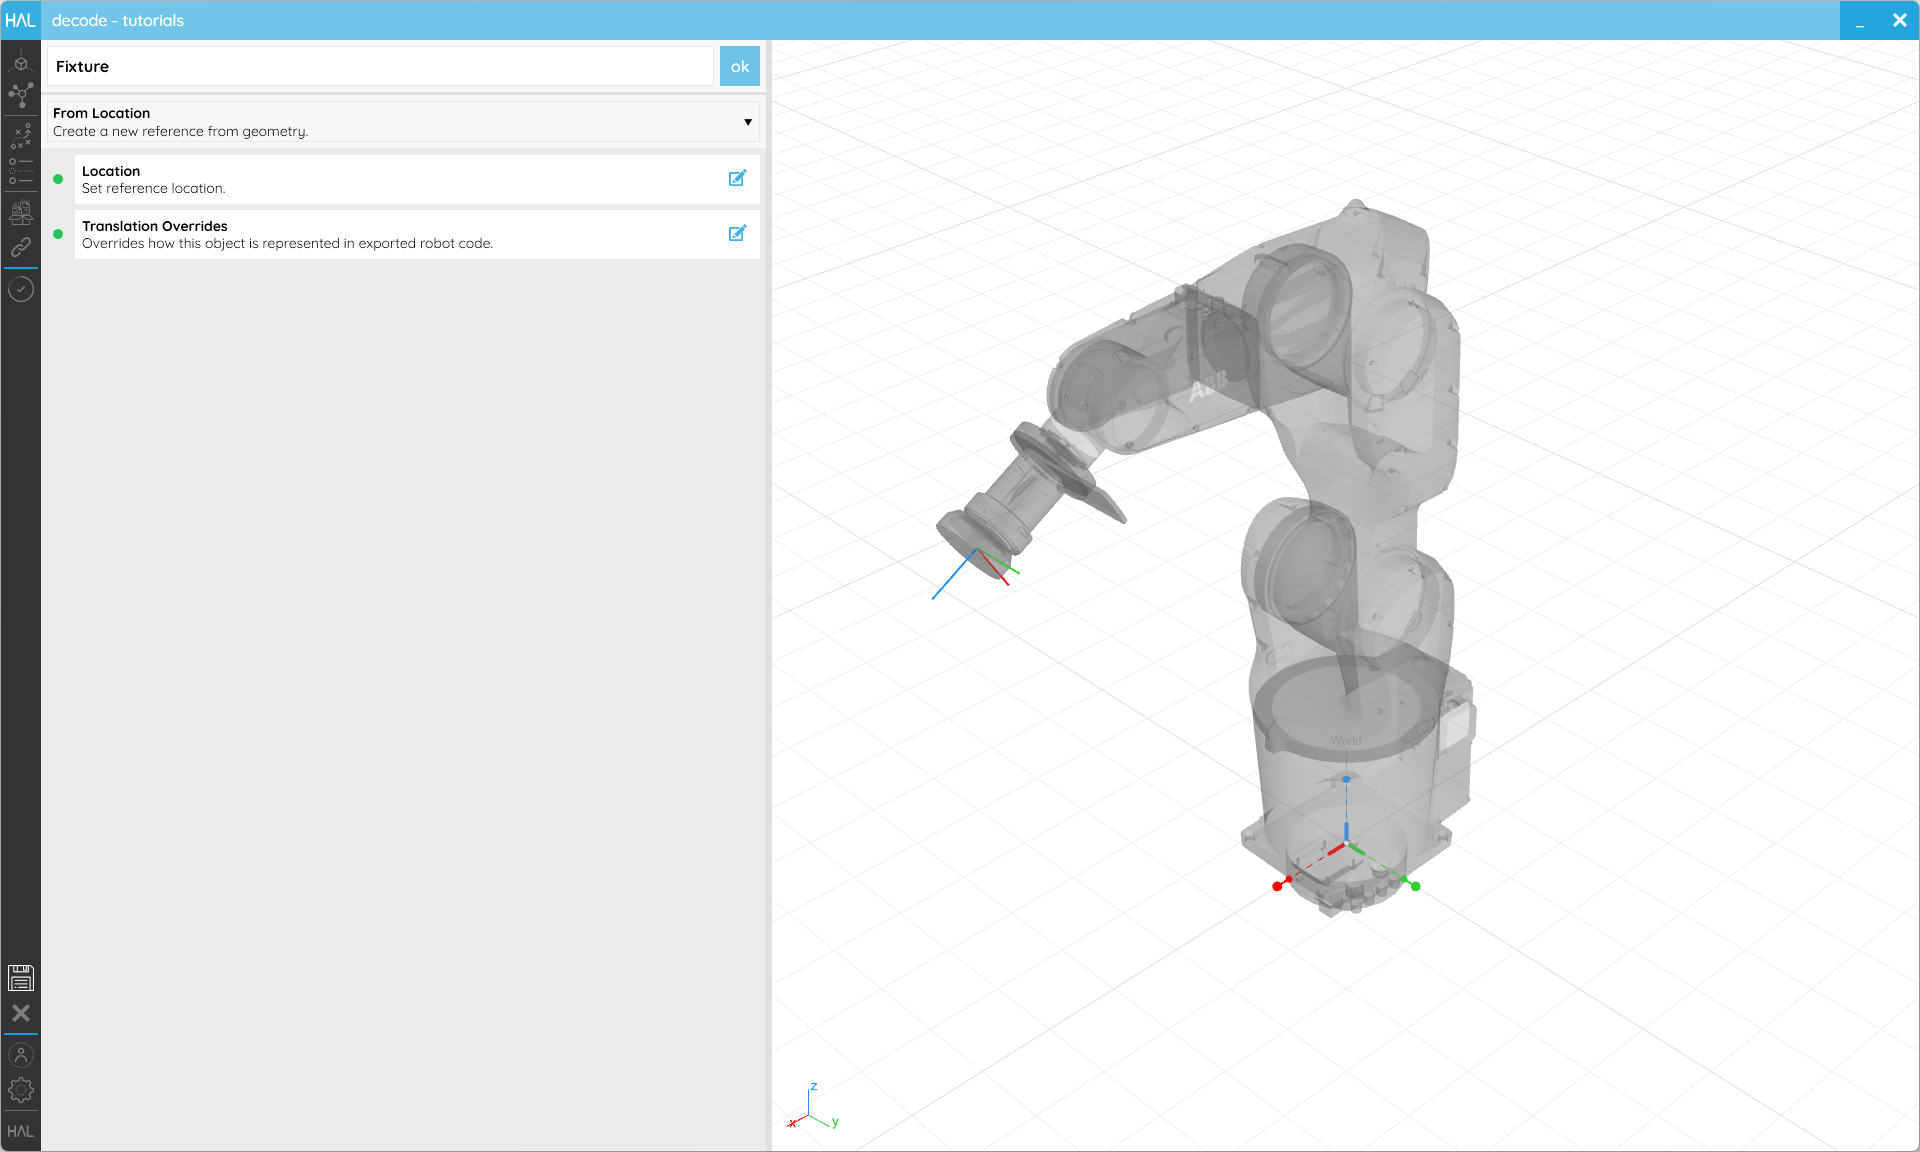
Translation Overrides
The Translation Overrides Step is common amongst items that will be exported to robot code and shows another setting type, the toggle. You’ll find these dotted around the software and they will allow you to activate or deactivate other, optional settings. In this case, whether or not you want to change how the Name of the Reference is exported, and if so, how.
![]()
The decode Reference editor with the Translation Override Step being edited.
There are a few other settings types that you’ll find within the software that are worth being aware of.
- Catalogue settings will load a catalogue of presets in a new window. Double clicking on, or selecting, an item will close the catalogue and return you to the editor.
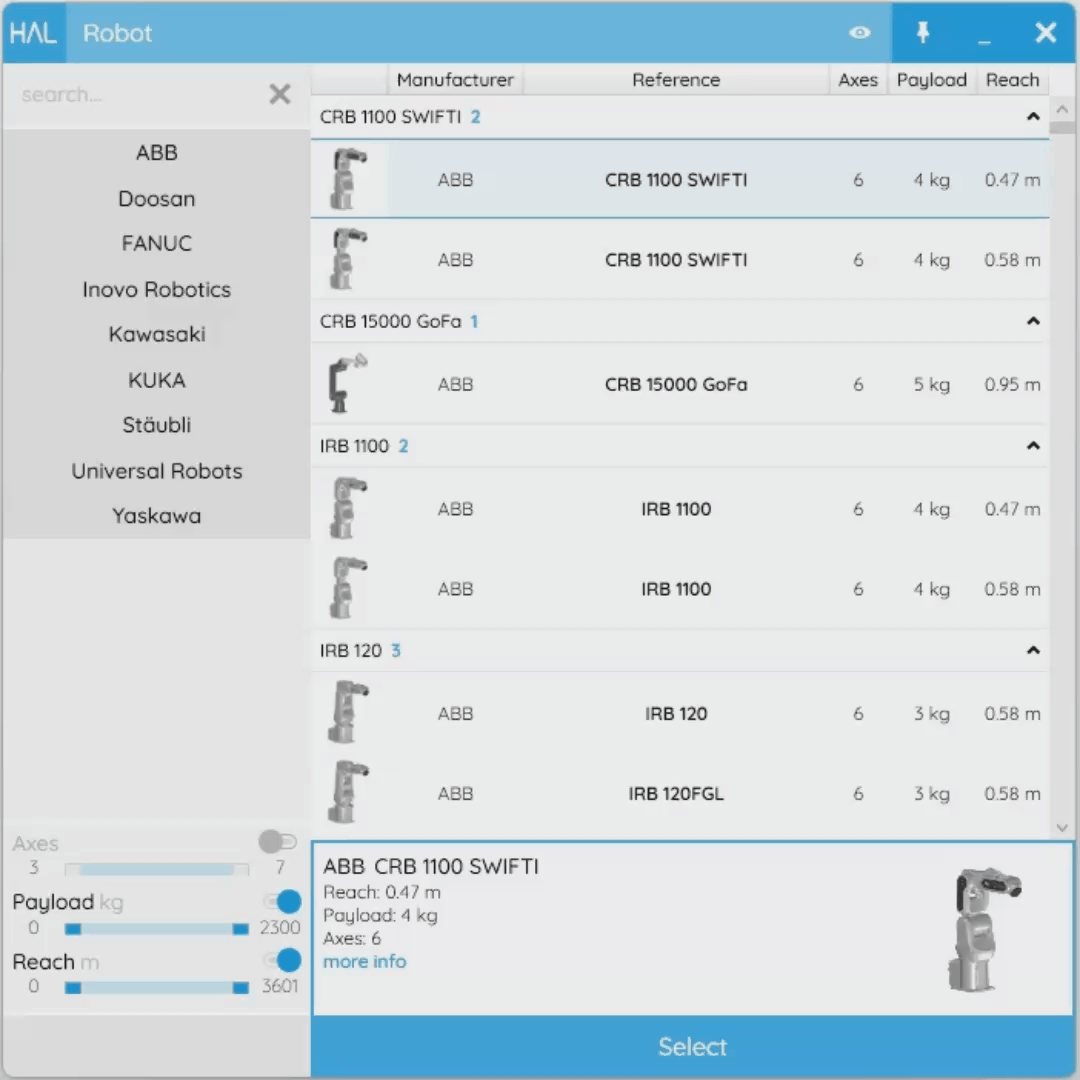
The robot catalogue.
- Nested Wizards are Wizards within Wizards. They are mainly used to group Steps or allow you to swap between a different set of Steps for a single operation, and work just like the normal Wizards.
A nested Wizard.
- Menus store a few extra commands in certain screens, generally for adding or removing entire collections. Their content changes based on the screen they’re on.

A menu button.
- Selectors allow you to select items from your 3D viewport. They have their own collection of items which you can add to or remove from but can also have constraints like allowing only a single item. A pop-up at the top of the viewport will give you extra information during the selection process.
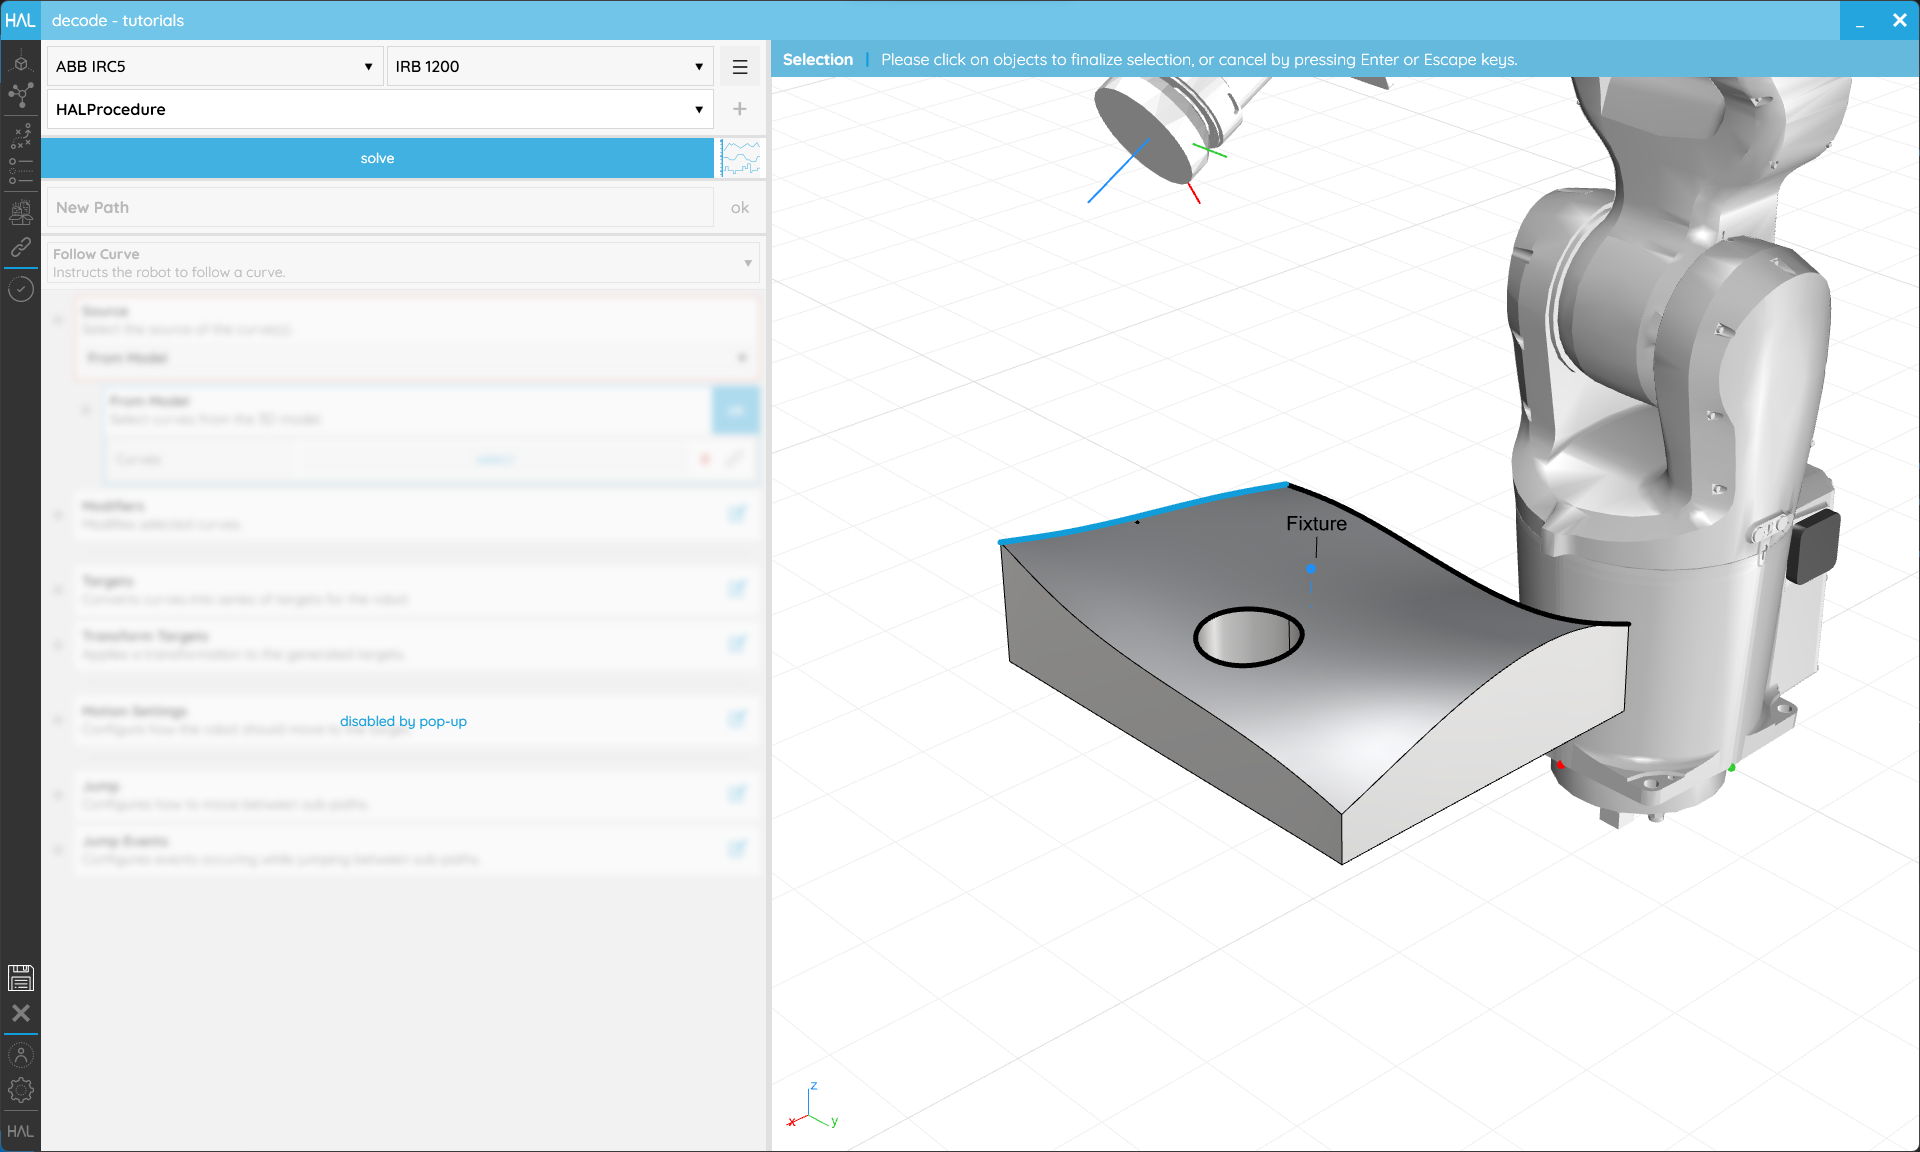
A selector in action.
1.4. Variables
Objective:
In this tutorial we’ll look at the Variable manager and how it can help you manage your variables in decode.
Background:
Variables are used to reuse data or values in multiple locations throughout decode. For example, they could be used to ensure that the same speed is assigned to multiple Moves or that the blend radius matches the spacing of a sanding pattern. Variables are always of a specific type, i.e. a length, and are created from a setting which has a link 🔗 symbol. Clicking on that icon will bring up the local Variable manager, which will list existing, compatible Variables. If none are listed you can set the Alias and Description to create a new one. You can then use the buttons at the bottom of this window to link or unlink a setting from a Variable. You can return to this window after you’ve linked a Variable to a setting by clicking on the same button again. Once a setting has been linked to a Variable it will no longer be editable locally.
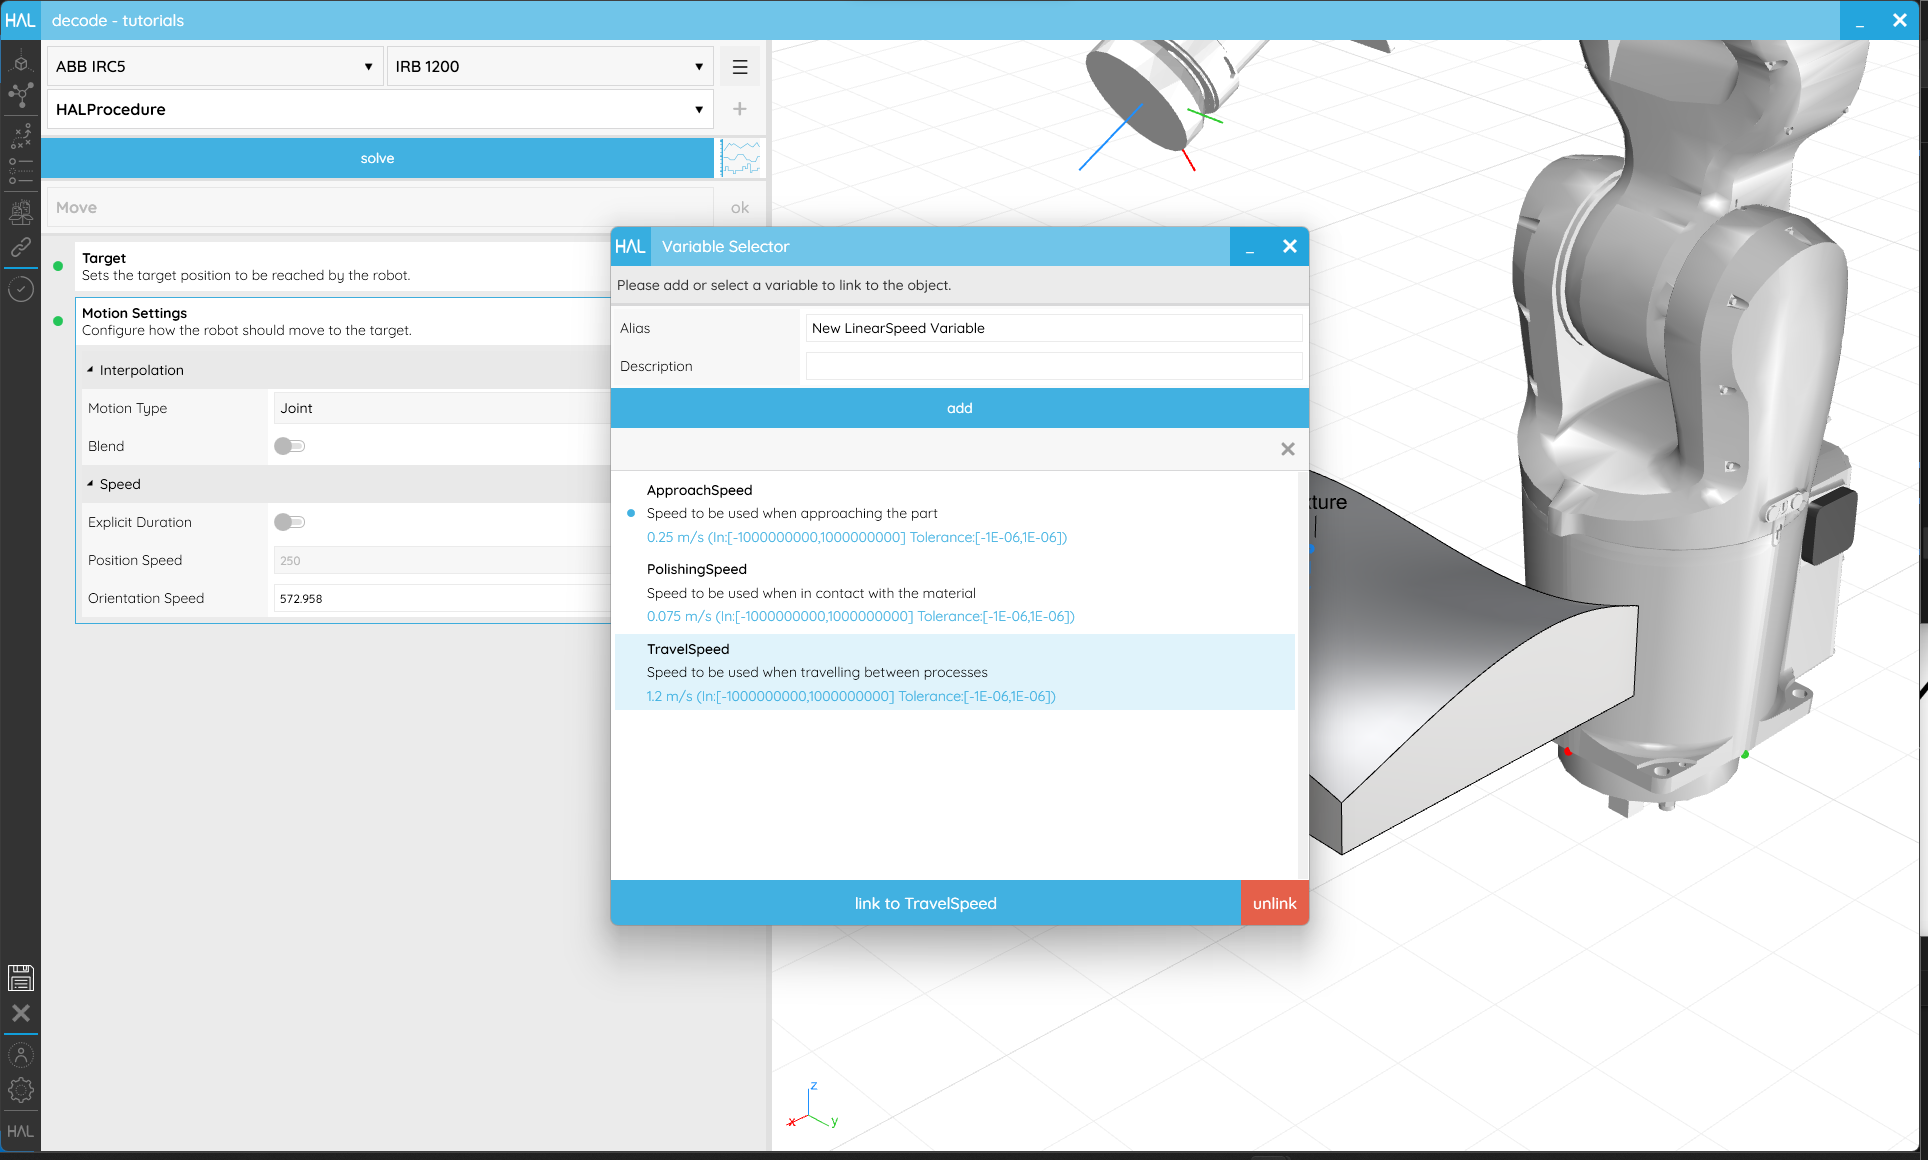
Variables make decode extremely flexible and allow changes to be propagated easily.
The Variable manager, the screen with the link 🔗 symbol, allows you to manage all your existing Variables. The number of times a Variable is linked is shown in the upper corner of the Variable and any with 0 links can be deleted. All those with 0 links can be purged in a single click with the purge button.
By selecting a Variable, the Alias and Description can be changed and the value changed in the Source Value by using the edit button or setting it directly.
Variables are very powerful and can link out to other pieces of software to do data exchange. If you are interested in those more advanced features, please see the Advanced Programming tutorials.
1.5. Assets
Objective:
In this tutorial we’ll look at the Assets manager and how it can help you manage your imported assets in decode.
Background:
Coming soon.